Lil' Red

Happy Halloween! Well, first I hope everyone is safe, sound, with power, cell service, etc. Second, Happy Halloween! I'm so glad the kids around here will still get to go trick or treating tonight. Emma's still a little young for that, but I made her a costume anyway because we all know I just couldn't help myself.

I used Simplicity 1774, red fleece for the cape, and blue gingham for the dress. The pattern could not have been easier, especially with fleece because that meant I didn't have to line the cape. I did add some topstitching to give it a more finished look. And I used buttons to fasten the shoulder straps instead of hook and loop tape. Mostly because I forgot to buy hook and loop tape.

We were late getting out the door this morning, so this was the best I could get. (Note to self, learn how to use my Speedlight. That grain is killing me!) What you can't see here are the adorable new white chucks I got her to go with her costume, which of course are her favorite part.

Have a happy, safe, and sugar-filled Halloween, everyone!

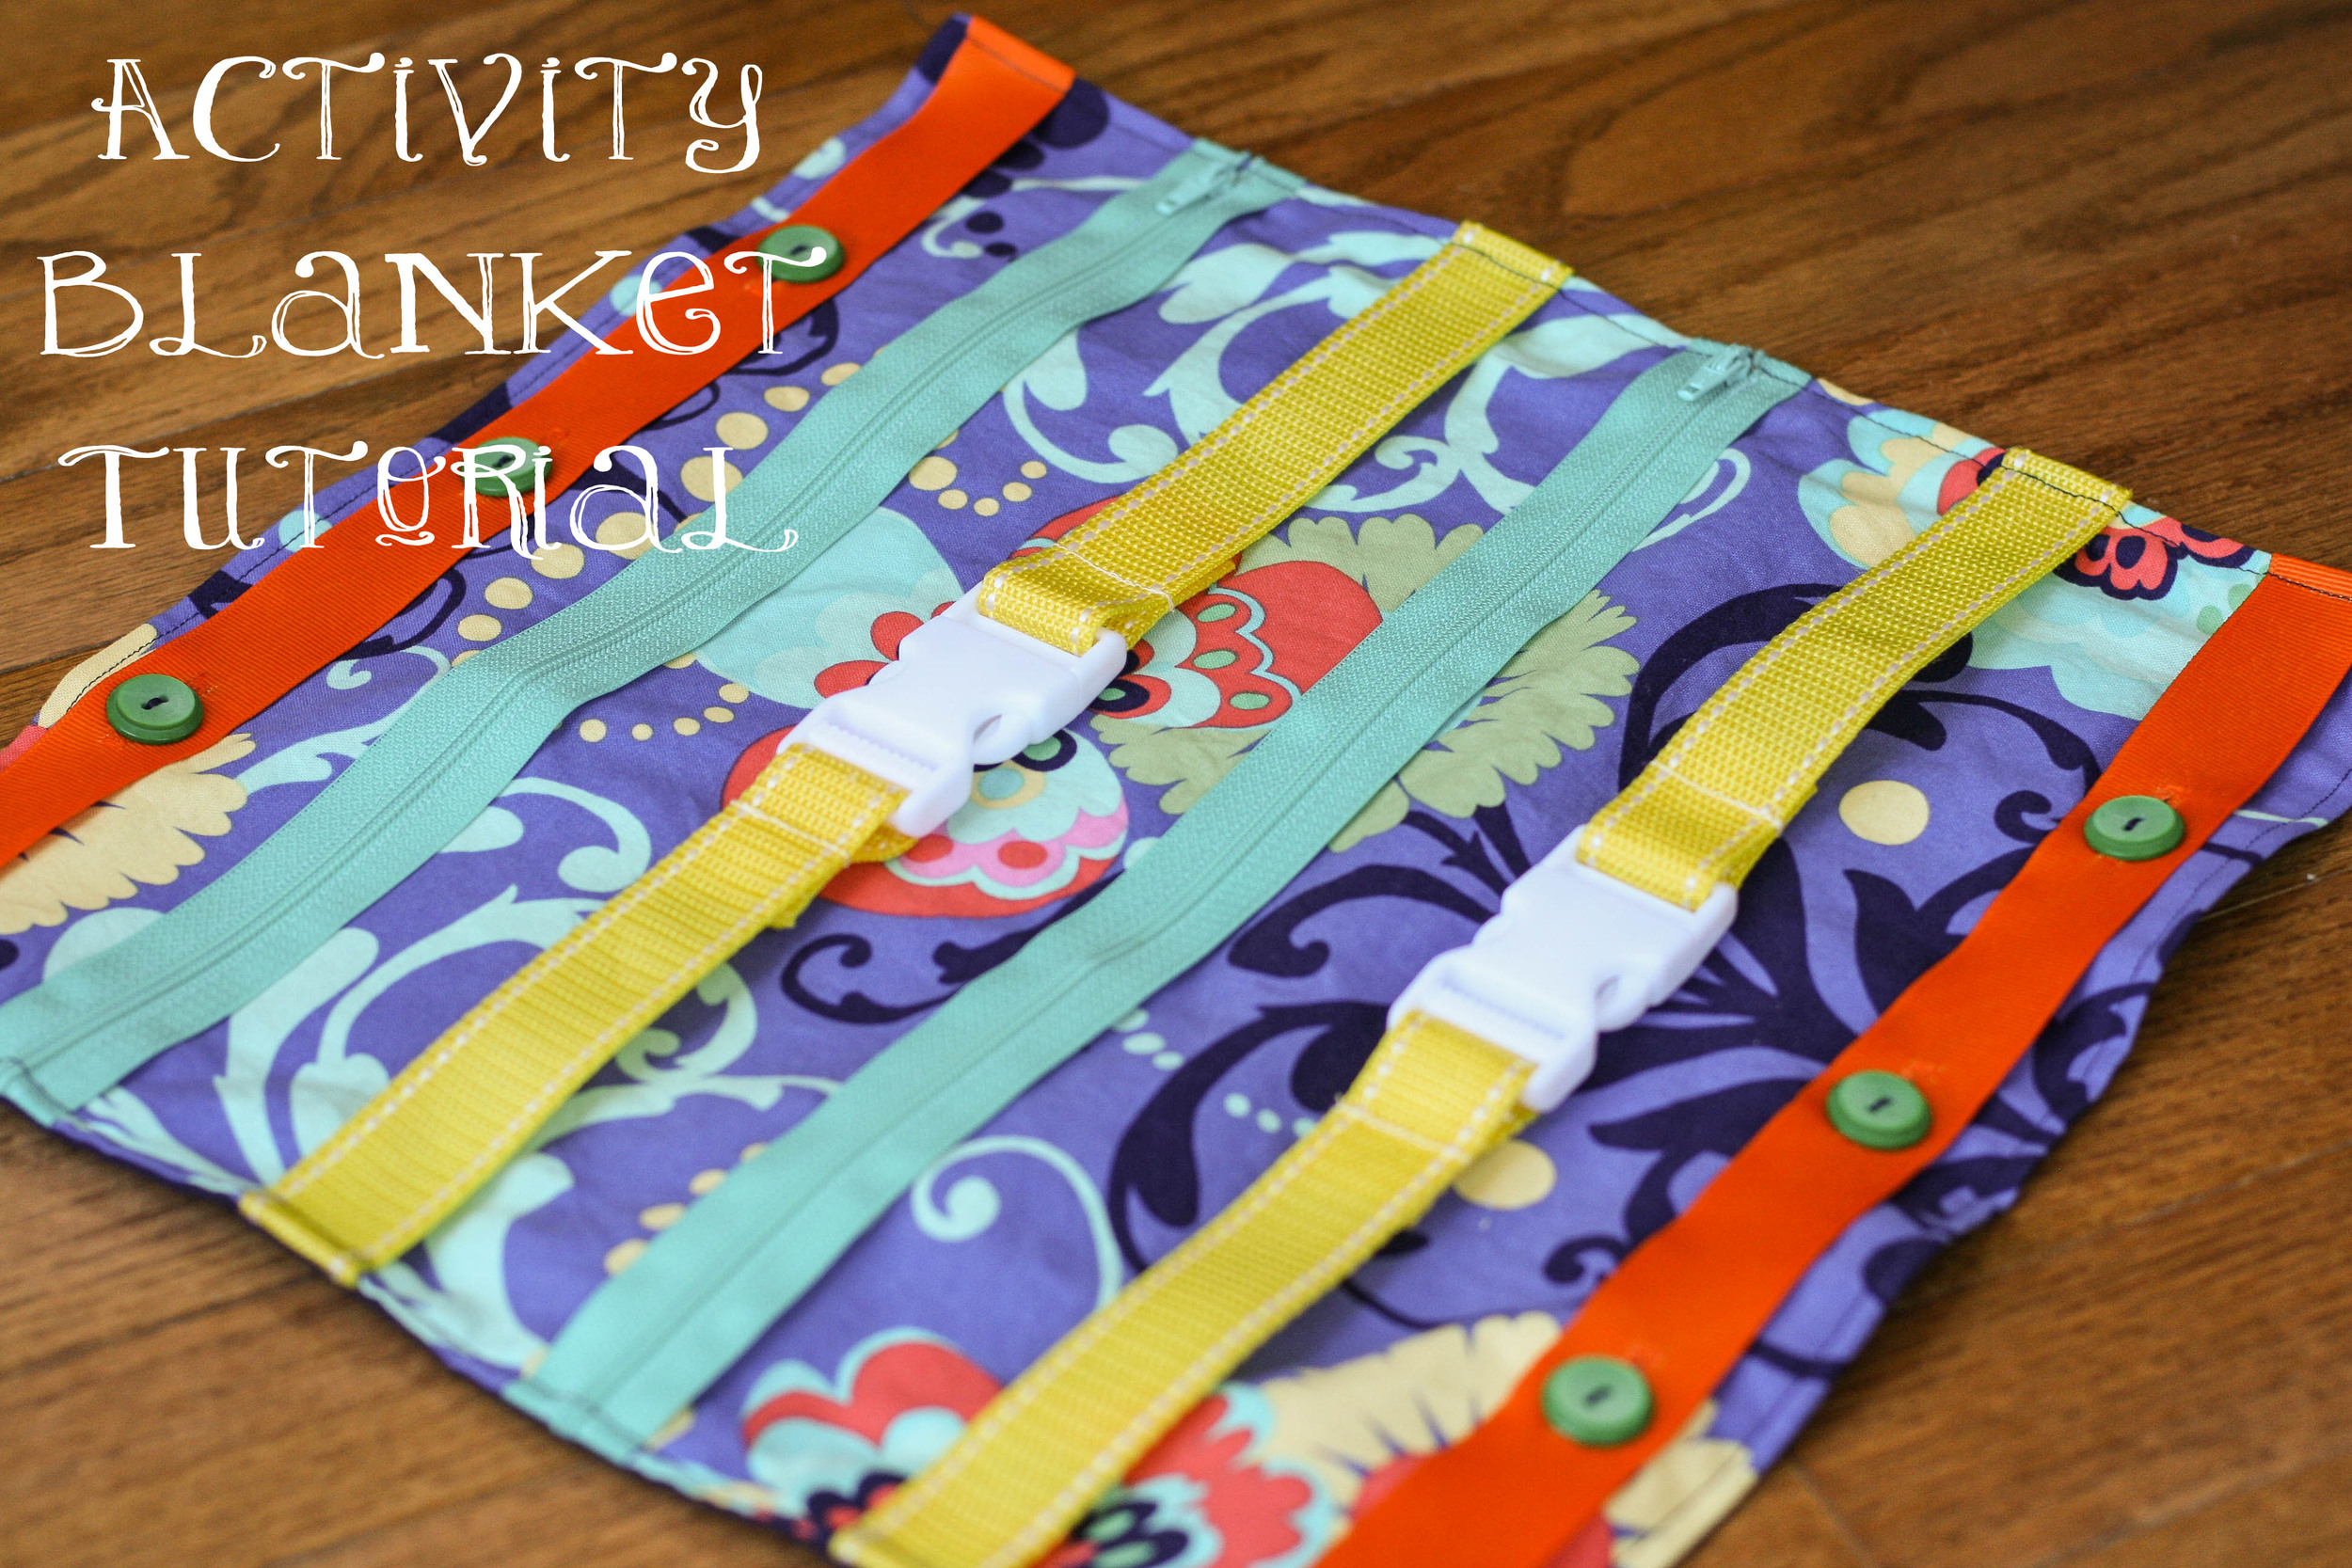
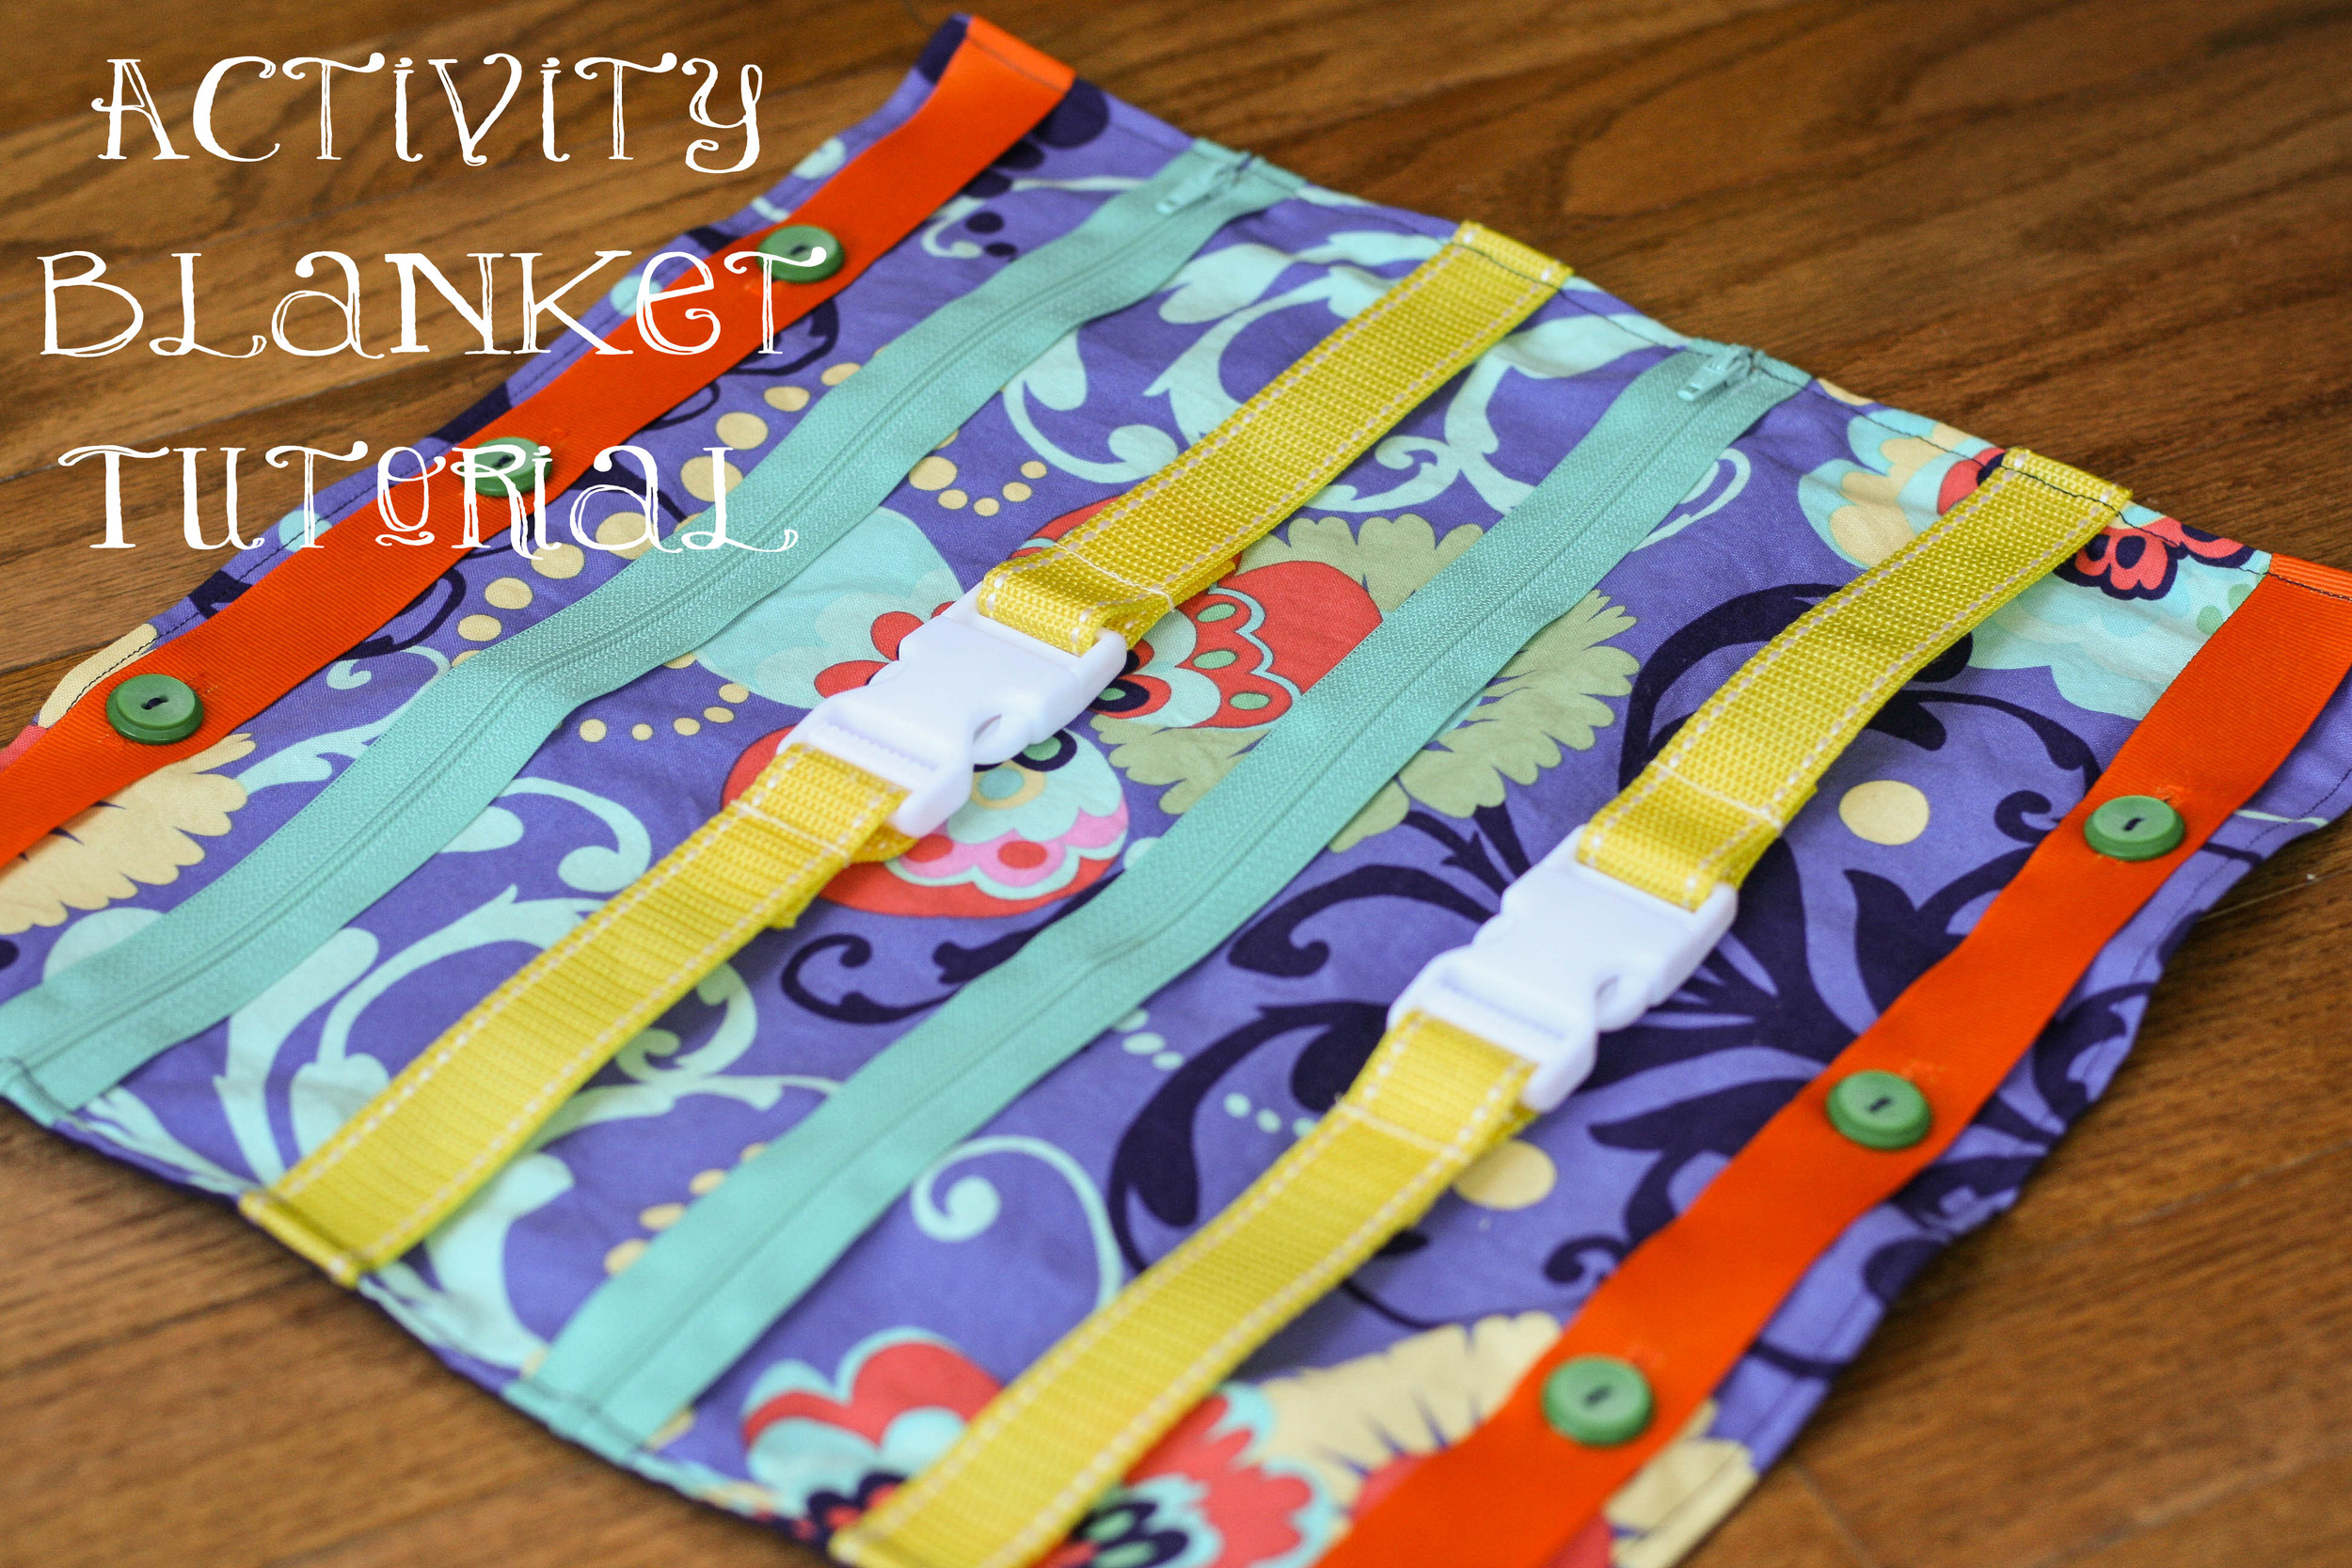
activity blanket tutorial

activity-blanket-tutorial.jpg

Emma has been obsessed with clips and zippers lately, so I thought I'd make her a little activity blanket so she could clip and unzip to her heart's content. (I can't even tell you how good it felt to bust out my sewing machine for the first time in months.) And, it was so simple to make that I actually made it during naptime on Sunday afternoon. Plus I used scrap fabric, and I love any project that puts even a little dent in my stash.

If you're just learning how to sew, this is a great beginner project because aside from the button holes it's just a bunch of straight stitches. And there's no need to be intimidated by button holes... most newer machines do all the work for you!

Here's what you'll need to make your own:

Materials:

  • Two 15.5 x 15.5 in. squares of fabric
  • Two 15.5 in. pieces of grosgrain (or similar thick ribbon)
  • Four 6 in. pieces of nylon webbing (or similar thick webbing, ribbon, straps, etc.)
  • Two 14 in. zippers
  • Two plastic buckles/clips
  • Buttons (at least 6)
  • Lighter (yes, you read that right!)
  • Coordinating thread

Directions:

Create your clip "activities" by sewing your 6 in. pieces of nylon webbing to each end of the buckle. Now here's the fun part - use a lighter to seal the cut ends of the webbing. Yes, it's a little sad that the most badass my life gets these days is taking a lighter to some frayed edges, but I take what I can get. :) Besides, it really is the best and quickest way to make sure your ends don't fray.

Next, lay out your "activities" on your front fabric to get the spacing right. I just eyeballed mine, leaving about an inch and a half between activities.

Pin only the zippers in place and remove the rest of the activities.

Sew your zippers into place.

Set the blanket aside for now and grab the ribbon for your button activities. Mark the spots for your button holes at 4", 7.5", and 11".

Sew your button holes. I used 1" buttons for this, and wouldn't go any smaller. (Note, if you use grosgrain and have some fraying when you open your button holes, use your trusty lighter to carefully seal the edges.)

Next, lay your activities out on the front fabric again, pin and baste into place.

Then, grab your back fabric and pin it to the front fabric, right sides together. Sew together using a 1/2" seam, leaving a 4-5" opening at the bottom.

Press your seams open, then turn the blanket right side out and sew a 1/4" topstitch around the perimeter.

Last but not least, sew on your buttons. I chose to sew mine on at the very end because I'm paranoid about Emma being able to get them off, creating a potential choking hazard. I figured two layers of fabric would be a sturdier hold.

And once all the buttons attached, you're done!

Emma is loving it so far, and I'm excited to see how her interest in it changes as she becomes better at manipulating each activity.

Let me know if you make one, and leave a comment if you have any questions!

make this look: garden wedding

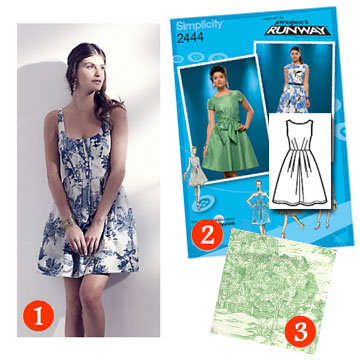
  1. Original dress: Anthropologie
  2. Pattern: Simplicity 2444
  3. Green toile: Fashion Fabrics Club

Today’s “make this look” is proof that I’m living in sewing dreamland… I’m not going to a wedding this weekend, I’m cleaning out my basement.  In fact the only weddings I’m going to this year are both in October, when it will be cool and drizzly and decidedly un-gardenlike.  But alas, while I’m wearing grubby housework clothes this weekend I’ll be dreaming of wearing this lovely little number from Anthropologie – which you can knock off and make your own for a fraction of the price.  You’ll need Simplicity 2444, 3 ¼ yards of green toile, and 3/8 yard of lightweight fusible interfacing.  (After my Weekender Bag experience, I swear by Pellon Stacy Shape-Flex.)  Finish the look with a gold cuff, earrings, and sandals.

Have fun with your Pinot and finger sandwiches!  I'll be in my basement, wondering how we accumulated so much stuff we have absolutely no use for.

baby shower gift set

My dear friend Angela is expecting her first baby any minute now, and I was lucky enough to be home in Virginia for her shower a couple weeks ago.  About a month before the shower I started searching the web for gift ideas and settled on a nursing cover / burp cloth combo set.   (I'm not one for going completely off-registry, so Jared and I also got her the breast pump and pump car charger she'd been wanting... yes I know, a bit of an accidentally awkward theme gift.)  Angela doesn't know if she's having a boy or girl (I'm in awe of her will power), and I had a stash of Amy Butler's Morning Glory fabric so... voila:

The nursing cover tutorial couldn't have been easier.  As you can see I opted to use one fabric (I also skipped the optional pocket.. shhhhh.)

I went a little off-tutorial for the burp cloths, though not intentionally.  The tutorial makes it very clear that you should cut your fabric to the size of each pre-washed cloth diaper, as each one is different and very rarely 18" long.  So what did I do?  I cut each strip 18" inches long!  Brilliant.  I didn't have enough fabric left over to cut new strips, so I added the ribbon trim to the top and bottom of the strips (instead of down the sides) to hide the shortages.  They still look pretty cute, though.  Right?  (Yes, in my humble-completely-biased-opinion.)

I added a very special little touch to this gift set...

...but more on that later.  :)

Amy Butler's Wide-Leg Lounge Pants... finally!

I've been wanting to make Amy Butler's Wide-Leg Lounge Pants ever since I got In Stitches. They might actually be the reason I got the book in the first place. So along with the gifts for Lindsey and David, I threw the lounge pants onto my Christmas craft list.  For the primary fabric I chose Midwest Modern 2 Happy Dots in Ice, and for the cuff I chose Belle Kashmir in duck egg.  (Thank you, Amy Butler, for making your fabric collections coordinate so nicely with one another!) The pattern was easy enough to follow, though I varied from the instructions a bit:

  • I didn't have freezer paper, so I used printer paper by taping the sheets together and cutting them to size.
  • I used cotton twill tape for the drawstring.
  • I added 5 inch cuffs in a coordinating fabric.

Here are the finished pants...

the first batch of christmas crafts

My ability to blog about this first batch of Christmas crafts sadly means my short trip to Michigan to visit my best friend, Lindsey, has already come and gone. (All you girls lucky enough to live in the same town as your best friend - stop reading this, go over to her house and give her a big fat hug, because you are very very fortunate!) I have a small tendency to spoil Lindsey, especially since the birth of her son Will, so I tried to scale back this year and focus more on craft than cost. Will's presents were easy - Amy Butler's Little Stitches provided plenty of inspiration and baby clothes are so small they require very little fabric. I decided on the Kimono PJ pants and used Moda's Funky Monkey fabric in Sock Blue, Cream Counting Monkeys and Brown Sock Texture (for the cuffs.)

I used leftover fabric from the pants to applique coordinating onesies:

Here are the finished sets:

A couple tips for these pants... 1) Use 3/4 inch wide elastic or make the casing for the elastic a little bigger because the 1 inch elastic was a really tight fit. 2) Make the pants about 1-2 sizes larger than you think you'll need. Will is 5 months, a bit small for his age, and just started wearing 6-9 mos. clothes. I thought I'd be safe making the pants size 6-9 mos. but they were pretty snug around his diaper. They'll be fine for him for only another month or so, which is why I'll be making him 2 more pairs in a bigger size.

For Lindsey I aimed for a combination of pampered and practical. I'd been dying for an excuse to pick up Amy Butler's new Love collection, and thought it would be perfect to use for a little library tote since Lindsey's a regular at the Berkley Public Library. I used Lotta Jansdotter's Simple Tote pattern as a starting point, and added lining using some leftover fabric from Lindsey's Weekender Bag.

This bag was super easy to make and the lining added a nice finished look to the original pattern. I used the bag as gift wrapping and threw in some Philosophy Amazing Grace bath products (the pamper part), and the Exhale: Core Fusion - Pilates Plus DVD (the practical part.) Lindsey loves working out but as a new mom doesn't have a ton of time, so the 10 minute workouts on this DVD are a great solution.

More Christmas crafts to come... :-)

4 Weekender Bags in 4 weeks

I've had a lot of overly-ambitious crafting ideas in my life, but this one was beyond insane - with only a month to go until my wedding I would make EACH of my bridesmaids the (infamous) Weekender Bag by Amy Butler.  That worked out to 4 bags in 4 weeks.  Of course I got my heart set on the idea before I searched the blogosphere and discovered that this was a beast of a pattern.  But, I was determined.  The first bag took me about 2 weeks (with my bachelorette party in Vail squeezed in there) and by the time it was done I was dreading the fact that I had 3 more to go.  It was everything other bloggers said it would be, and then some.  No tears, but a heck of a lot of ripped seams.  The whole process was so exhausting that the only pictures I took were with my phone!  (I promise, this is the last project I'll post with such crappy pics.)

Anyway, here's bag #1:

The second bag was SOOO much easier than the first one.  In fact, if you're attempting to make this bag, I definitely recommend making two - just so you can remember the whole thing fondly and enjoy the satisfaction of feeling like there's no pattern you can't handle.  Here's bag #2:

And bag #3:

Finally, (and trust me, it was a BIG, WONDERFUL, HAPPY finally) bag #4:

It was all worth it in the end:

Here's my advice should you decide to embark on your own Weekender Bag adventure...

Scour the blogosphere for all the hints, tips, and pictures you can find.  The tips from other bloggers that I found most useful were:

1) Use seam tape when making the prepared cording instead of sewing the seam closed. I tried it both ways and the seam tape actually creates a much cleaner look and you don't have to worry about making sure the seam is hidden when you sew the cording to the exterior panels.

2) Add interior pockets. The pattern doesn't come with any, and it's such a big bag having interior pockets is a really nice addition. I added a small zipper pocket (tutorial here), and used the large exterior pocket pattern piece to create two additional pockets inside (cut 2 extra pockets when you do your initial cutting, sew wrong sides together, then attach it to the lining by basting the sides and bottom, and sewing a seam up the middle to create two pockets.) You'll have more than enough fabric leftover to make the pockets, so don't worry about having to buy extra yardage.

3) A lot of blog posts indicated that there was no such thing as a 30" non-separating zipper. There is. I got this one and it was neutral enough to use for all 4 of my bags (you really can't see the zipper much once it's done anyway.) You might want to add a little zipper pull, though, because the zipper takes a bit of breaking in, especially on such a big bag.

4) Many of the blog posts below (and in general) were written before Amy Butler revised the pattern to improve upon her first version. If you buy the pattern now, it should have a lot of the tips and work-arounds already included (such as using Peltex instead of Timtex.)

5) The cutting for this bag takes a LONG time. Be prepared to devote most of your first day to getting everything cut. (You won't feel like doing anything but kicking back with a nice big glass of wine once you're done with this part.)

Here are the blog posts I found most helpful (i.e. couldn't have made it through the first bag without them):

http://miss-behave.de/2009/02/weekender-travel-bag/

http://www.amyalamode.com/blog/2008/09/14/second-times-a-charm-orchristmas-in-september/

http://hiuma.blogspot.com/2008/10/first-big-project-weekender-bag.html

http://craftoholic.blogspot.com/2006/05/my-weekender-bag.html

http://knitlint.wordpress.com/2007/07/14/finished-object-amy-butler-weekender-bag/

ties and dachshunds and spartans, oh my

As if I needed another excuse to craft, my best friend gave birth to her first child this summer... a handsome and happy little guy named, Will. I am a firm believer that stuff is just cuter when it's small, so when I saw the appliqued tie onesie tutorial on Crap I've Made, I could think of nothing cuter to make for the new man in my life.  I used some of my hubby's old clothes for the fabric, and followed Char's instructions to create onesie #1:

But why stop there when onesies come in packs?  :-)  The dog in Will's life is a sweet little dachshund mix Lindsey's parents adopted named Kallie, so I created my own doggie template and used one of the hubby's old dress shirts for the fabric.

Front

Back

And lastly, I had to make sure Will was decked out in some one-of-a-kind Spartan gear - which Lindsey was sweet enough to put on him when he went for his 3 month pro pics.

three weddings and a shopping hiatus

On January 1st, 2008 I made a promise to myself that I wouldn't buy any new clothes for an entire year. I was allowed to buy second hand (most often from Buffalo Exchange downtown) and if I wanted something new, I had to make it myself. The point was to try to force myself to learn how to make a variety of different types of clothes. As with most of my overly-ambitious crafting adventures, things didn't work out quite as I had planned (i.e. I didn't make nearly as many clothes as I thought I would.) The first thing I made was a dress for our friends' wedding that spring. I started with McCall's pattern M4826, and modified it to add a panel insert to the front of the skirt.

I had zero expectations for how it would turn out, so I was pleasantly surprised when it actually fit!  (The duct tape dress form Jared helped me make helped a ton.)

The next dress was for another wedding and this time I used Simplicity 2951.  In hindsight, I wish I'd used a cotton fabric (maybe in navy) instead of satin.  Something about the light colored satin and the shape of the dress made it feel slightly too young for me, but I'm still happy with how it turned out.  The fit was even better than the first dress, and when it was done I felt like I was actually starting to get a hang of this whole dress making thing.

(ignore the bumpiness of the dress form)

The third dress was for - you guessed it - another wedding.  I've always loved the simplicity and ease of matte jersey wrap dresses (perhaps from my days working retail at Banana), so I decided to try DKNY pattern V1027.  It was such an easy dress to make (especially compared to the first two!) and it's super comfy to wear.

Bodice front

Bodice back

Full dress from the front

Full dress from the back

a green tote for a green thumb

This was the bag that reignited my passion for sewing.  My mom taught me how to sew when I was a little girl, so it seemed fitting that my first real project as an adult would be a gift for her.  I decided on the Garden Tote from Lotta Jansdotter's Simple Sewing, with green canvas for the exterior, and black and white floral cotton to create a nice contrast with the interior.

Garden Tote gift set

my adorable Mom proudly showing off her xmas gift

Garden Tote close-up

The design of this tote is great because it has lots of pockets to store your gardening tools, and it's sizable but not so much so that it's too bulky or awkward to carry.  The pattern is fairly easy as far as bags go, and the only real trouble spots were the corners when sewing the bottom to the exterior.  I gave this to my mom for Christmas in 2007, and it's (thankfully) held up very nicely for her since.