{nursery progress} the big reveal!

Now that Emma is finally here, I can show you her finished nursery! The expression "labor of love" has a whole new meaning for me now, but we did put a lot of hard work and care into getting her nursery just right. If you remember back to my initial post about the nursery, this is the design plan I started with:

And here's what the room looked like before:

Starting with a firm budget of $1500, we set out to try to create a sweet, DIY inspired, eco-friendly nursery...

Here's the breakdown of what we DIY'd:

DIY'd:

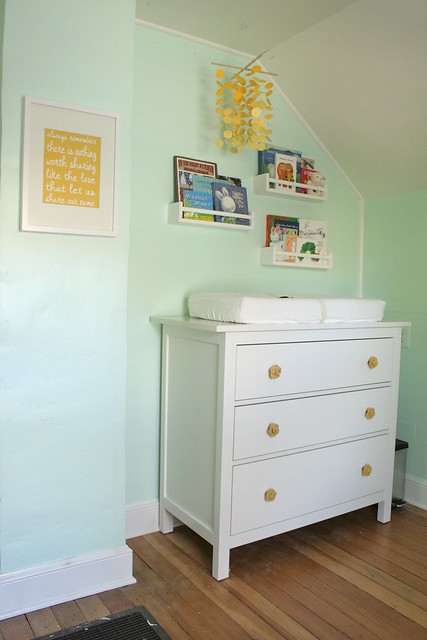
As I mentioned before, we set a firm $1500 budget for the nursery - and while my husband had serious doubts about my ability to stick to that budget - I'm very proud to report that I came in UNDER BUDGET at $1302.24. The biggest expenses in the room were the Naturepedic organic crib mattress ($259), the Ikea Hemnes dresser ($199), the DaVinci Rivington crib (on sale for $191.99), the Elfa stacking drawers for the closet ($99), and the Naturepedic organic changing pad ($89.10). Together, those purchases made up almost 2/3 of our whole budget. We could have cut corners a bit by not going organic for the mattress and changing pad, but raising Emma in an eco-conscious way is very important to us, so we were willing to invest a little more for those things.

Here are close-ups of most of the things I DIY'd:

Bird mobile

Paper circle mobile

Golden Slumbers print

Murder in the City print

Monogrammed throw pillow

Personalized baby quilt

Bunting

Gum Drop ottoman

I hope you like it!  Well, really I just hope Emma likes it. :-) It was a lot of hard work, but we couldn't be happier with the final result. Leave me a comment if you have any questions about resources or any of the DIY projects!

{nursery progress} gum drop ottoman

I'm happy to report that I reached my goal of having the quilt and ottoman done before the end of my 2nd trimester.  Woohoo!  I'm not sure I want to know how much worse my back would have felt if I'd left all this sewing for my 3rd trimester.

The Gum Drop Pillow/Ottoman pattern was pretty easy to follow (for an Amy Butler pattern), but I think my choice of flannel is going to come back to haunt me.  I'm not sure how it'll hold up over time, and it was stretchier than regular cotton so I ended up needing way more batting than the pattern called for (11 1/4 lbs!!!).  So why did I go with flannel?  It was the exact color I was looking for.  Sometimes color trumps common sense.

I'm also not sure how I feel about it being slip-stitched closed.  I've become slightly anal about making sure every bit of fabric in the nursery is removable and washable, so it makes me nervous that this ottoman doesn't meet those criteria.  I'm thinking the first time I have to rip those stitches open, take out all the batting, and wash out whatever unpleasantness got all over it, I'm going to sew in an invisible zipper.

Since the ottoman is pretty big (though it's the perfect size for supporting my feet while nursing or reading to the baby) it'll spend most of the time living under the window to clear up floor space.

You'll also notice that we finished painting the Poang!  It took 3 coats of semi-gloss (using a foam brush) after sanding down the varnish, but it was worth it.  It fits much better in the room than the natural wood did.

Up next... I've been working away on the mobile and I'm hoping to get it done this week.  I didn't realize until I had everything cut that the birds need to be hand sewn.  Yuck.  But I have 4 done, and they look super cute, so hopefully it'll be worth all that extra time.  In case you're wondering, it does occasionally cross my mind that my daughter will never remember all this stuff I'm doing for her room, but then I stand in there and see how everything's coming together and it makes me happy enough to no longer care.  :)

nursery progress: the design plan

Before we found out the baby's gender, I thought I had my mind pretty made up about the direction I wanted to go in for the nursery if it was a girl. (I didn't really have a clue for the boy, so from a design perspective it was rather convenient that the baby turned out to be a girl.) I never ever thought I'd be a pink nursery kind of person, but when I saw this color palette I was a convert. It was the right combination of feminine, fun, pretty, and vintage. I just had to sell Jared on the idea. So I created two mood boards: one with the pink palette and one with a cute yellow/aqua palette I'd seen on one of the baby design blogs I subscribe to. The plan was to make the pink palette so good that he just had to go for it, and make the yellow/aqua palette just so-so. Hey, I never said I was going to be totally objective about this process. :-) Here's the pink mood board I came up with:

Here's the thing. I liked it, but didn't love it. I had a much harder time than I thought I would finding the right fabrics and accessories, and I'm still not 100% thrilled with what I ended up with. It's cute and girly, but it just didn't come together as well as I had hoped.

So then I moved on to creating the yellow/aqua mood board:

And you know what? I completely fell in love with this room. Creating this mood board was fun, unlike the stress I felt trying to create the pink one. It was so easy to find great fabrics, art, and accessories to bring the room to life - which gave me hope that actually shopping for all that stuff would be a breeze. And I really liked the feel of it once it was all done - it's so sweet and cheerful - girly without being too obvious about it.

So I sent the mood boards to Jared for his thoughts, not telling him which one I liked better. He genuinely liked them both, but said there was something about the yellow/aqua room that sold it for him. Phew!

Now that the design was done I went back to the budget worksheet I'd put together to see if we could really have the nursery of our (okay, my) dreams on a $1500 budget. Thankfully, with a good amount of DIYing and a bit of repurposing, it's actually possible. Here's the plan:

To buy:

  • Crib
  • Mattress
  • Dresser
  • Rug
  • Light
  • Sheers
  • Cornice kit
  • Hardware (the Anthro hardware is a bit of a splurge, but it's one of those elements that really makes the room for me)
  • Bookshelves
  • 3 Frames
  • Hot air balloon print
  • Slide out bins for the closet floor

To DIY/sew:

  • Painting the walls, ceiling, trim, Poang, bookshelves, and built-ins
  • Fabric covered 7" cornice for the window
  • 2 changing pad covers
  • Crib/play quilt (Amy Butler pattern from Little Stitches for Little Ones)
  • Gum Drop Ottoman
  • Padded arm rests for the Poang
  • Toss pillow for the Poang
  • Paper circles mobile
  • 2 DIY art prints

So yeah, kinda a lot in the DIY column. I'm desperately going to try to get at least the quilt and ottoman done before the end of my 2nd trimester. The other DIY projects are on the easier side and I can enlist help for those if need be.

We've already gotten the first step of the nursery makeover done - bringing in an electrician to install a light switch for the overhead light (fumbling to find that little chain the middle of the night just wasn't going to happen, plus we feel like having a switch that dims is going to come in very handy) and adding another outlet to the wall where the window is. (For the record, the electrical work was not included in the $1500 budget because we felt like it was something the room needed regardless of what we used it for.)

The next step is paint! Luckily, Jared's "never painting another room in this house ever again" vow is no match for the love he has for his pregnant wife and beautiful unborn daughter, so we'll be tackling the painting together. I'll try to post pics of our progress along the way, so stay tuned...