I'm back!

IMG_5908.jpg

Hi everyone!  I can't believe a month has already gone by since I gave birth!!  Taking care of our sweet little girl sure makes the days fly by.  Speaking of, here she is...

Pretty stinkin' cute, if I do say so myself. :-) Parenthood is chaotic, but wonderful. Each week gets a little bit easier. Needless to say, I haven't had any time for crafting or sewing since she was born, but I'm hoping to make her at least one little outfit before the summer is over. Stay tuned...

{nursery progress} the big reveal!

Now that Emma is finally here, I can show you her finished nursery! The expression "labor of love" has a whole new meaning for me now, but we did put a lot of hard work and care into getting her nursery just right. If you remember back to my initial post about the nursery, this is the design plan I started with:

And here's what the room looked like before:

Starting with a firm budget of $1500, we set out to try to create a sweet, DIY inspired, eco-friendly nursery...

Here's the breakdown of what we DIY'd:

DIY'd:

As I mentioned before, we set a firm $1500 budget for the nursery - and while my husband had serious doubts about my ability to stick to that budget - I'm very proud to report that I came in UNDER BUDGET at $1302.24. The biggest expenses in the room were the Naturepedic organic crib mattress ($259), the Ikea Hemnes dresser ($199), the DaVinci Rivington crib (on sale for $191.99), the Elfa stacking drawers for the closet ($99), and the Naturepedic organic changing pad ($89.10). Together, those purchases made up almost 2/3 of our whole budget. We could have cut corners a bit by not going organic for the mattress and changing pad, but raising Emma in an eco-conscious way is very important to us, so we were willing to invest a little more for those things.

Here are close-ups of most of the things I DIY'd:

Bird mobile

Paper circle mobile

Golden Slumbers print

Murder in the City print

Monogrammed throw pillow

Personalized baby quilt

Bunting

Gum Drop ottoman

I hope you like it!  Well, really I just hope Emma likes it. :-) It was a lot of hard work, but we couldn't be happier with the final result. Leave me a comment if you have any questions about resources or any of the DIY projects!

on hiatus...

If you're reading this right now, that means I finally had our baby! Wooohooo!! It also means that my self-imposed break from blogging so I can fully focus on mommyhood has started. I'll return in a month or so, and in the meantime keep an eye out for the big nursery reveal post, which I've already written and will publish sometime in the next couple weeks (I've decided that hitting the publish button on my iPhone Wordpress app doesn't really count as blogging.) :-)

Thanks so much for all your support and kind words throughout my pregnancy!! See ya in July!

link love - 6.10.11

I'm only 4 days away from my due date, so the fact that I have absolutely nothing planned for this weekend is kind of glorious. I'm sure I'll come up with some unnecessary house projects to keep me occupied, but hopefully most of my weekend will be spent lounging in the sun and squeezing in a few last nights out with my husband. Anyway, here's what caught my eye this week...

  • Ultimate Chocolate Chip Cookie n’ Oreo Fudge Brownie Bar on Kevin and Amanda - And I thought the brownie covered Oreos I made a couple weeks ago were sinful! This is without a doubt the most ridiculous dessert concoction I've seen, maybe ever. And I mean that in the best way possible. What you're looking at here is brownie batter, poured over Oreos, arranged over cookie dough, served warm with ice cream on top. I've decided that if I go past my due date I'll be totally justified in making these.  Right?  Right.

  • Rosette Pillow Tutorial on Trey and Lucy - I love these rosettes, and the possibilities are pretty limitless... a whole duvet, perhaps? Okay okay, maybe I should just start with a pillow.

  • Deluxe DIY Sandbox on small + friendly - Jared and I were just talking the other day about how it would be difficult to have a sandbox out back for our wee one because of all the rain we get here, and this just might be the perfect solution. Not only is it covered, but it's also eco-friendly (salvaged wood, sealed with low-VOC protectant, and filled with all natural beach sand.)

That's all I've got for this week!  Have a great weekend, everyone!!! :-D

{nursery progress} paper circle mobile tutorial

paper-circle-mobile7.jpg

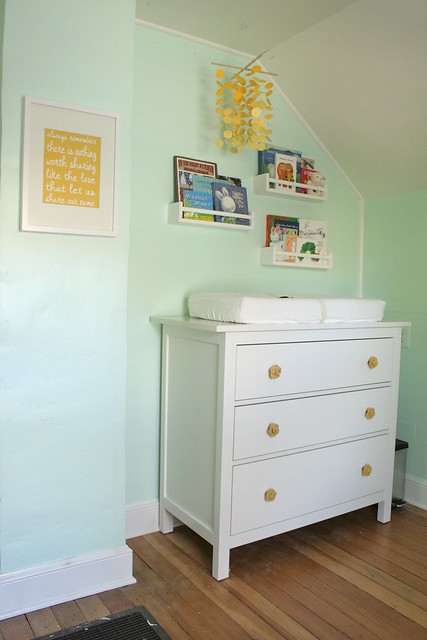
Here's the how-to for the paper circle mobile I made for our daughter's nursery... (similar ones sell for upwards of $50 on Etsy, but you can achieve the same look for much much less.)

What you'll need:

  • 2 12" long 1/4" dowels
  • Drill and very narrow drill bit
  • Fishing wire
  • 12 jump rings
  • Needle nose pliers
  • Clear beads (I used CraftDesigner faceted beads in crystal)
  • Pencil
  • Permanent marker
  • Needle or pin
  • 3 shades of the same color cardstock (this is to achieve a gradient effect... you could use all 1 color or multiple colors if you prefer.)
  • 1.5" circle punch
  • Hot glue gun
  • Screw hook

1) Prepare your dowels. Using a pencil, make a mark at 1.5", 3", and 4.5" from each end of the dowel so that you end up with 6 marks on each dowel. Then make a mark a 1/4" from the end of each dowel, and drill a very small hole (big enough for the wire to go through, but not so big that the bead will go through.)

2) Punch out your circles. You'll need 108 circles - 9 circles for each string, 3 of each color on each string.

3) Poke holes in your circles using a needle or pin.

4) Cut your fishing wire. You'll need 12 pieces of wire, approximately 24" long - don't worry about them being exact because you'll cut the ends once you're done putting on the circles and beads.

5) Prepare the jump rings. Using your needle nose pliers, stretch out a jump ring so that it's wide enough to fit onto the dowel. Then tie on a piece of the fishing wire and knot it, trimming the excess of the short end.  Repeat for the other 11 jump rings.

6) Place the jump rings along the marks on the dowels. Use your needle nose pliers to close the jump rings around the dowel.

7) Mark your fishing wire. Once the fishing wire is knotted onto the jump rings, take your permanent marker and make a mark every 2 inches from the knot on the jump ring.  Make 9 marks on each string.

8 ) String your circles and beads. Starting with the darkest shade of your paper circles, string one of your pieces of fishing wire through the pin hole in the paper circle. Then take a clear bead and knot the fishing wire around it at the mark closest to the dowel/jump ring. Repeat for the other 8 circles - circle, bead, circle, bead, etc. - going from your darkest to lightest shades of circles. Cut the excess wire after the last bead.  Repeat for the other 11 pieces of fishing wire.

9) Attach your dowels. Use a hot glue gun to attach the dowels together, crossing one over the other.

10) Hang your mobile. Cut 4 generous lengths of fishing wire, and knot one end of each piece of wire around a clear bead, cutting the excess of the short end. Slip each piece of wire through the holes you drilled at the ends of your dowels, so that the bead stops underneath the dowel preventing the wire from slipping through. Screw your screw hook into the ceiling where you want the mobile to hang (use a drywall screw if needed.) Once you determine how high or low you want your mobile to hang from the ceiling, tie the four pieces of wire into a knot and loop the knot onto the screw hook.

That's it!  Comment or email if you have any questions. There are a lot of variations you could do (like drilling holes and using beads to hang the strings instead of jump rings) so don't feel like you have to stick to the steps exactly.  This is just what worked for me.  Happy mobile-ing!

link love - 6.3.11

We're supposed to have FABULOUS weather this weekend here in Portland, and I couldn't be more excited. Warmth and blue skies are just what I've been needing. Oh, and I'm getting a massage, a pedicure, and we're going to see one of our favorite local bands - Sallie Ford & the Sound Outside. It all adds up to the perfect distraction from how dang uncomfortable I am these days! Here's what I loved from the blogosphere this week:

  • Bacon Lover's Mac and Cheese on Annie's Eats - The title of this recipe pretty much says all you need to know, but in case you need more convincing, here's how insanely good it looks...

  • The "Taking Notes" Skirt Tutorial on Sewing in No Mans Land - How freaking cute is this skirt???  Kelly included tutorials for making a version for mom, too, and I can't decide which one I like better. (Before you start to doubt me, I would never ever force our poor daughter to wear matching outfits with me - maybe matching aprons for my own amusement, but nothing in public.)

  • Tips for Photographing Your Home on Making it Lovely - This is something I continue to struggle with, mostly because the lighting is so hard to get right. I'm finally ready to take the big nursery reveal photos, so the timing of Nicole's tips couldn't be better. Hopefully they turn out well!

Have a great weekend, everyone!!! :-)

{nursery progress} DIY song lyric prints

IMG_5669_edited-1.jpg

One of the easiest ways I knew I could save money in the nursery was by making my own art prints.  We knew there were a couple song lyrics we especially wanted to use, so all I had to do was figure out the right fonts and colors.  I used PowerPoint (it's not just for presentations, people!) to design each print, and framed them in Ikea frames.

(Fonts: Eras Light ITC and Marketing Script)

I've always loved the song Golden Slumbers, which is good because it gets stuck in my head every time I'm in the nursery. I can't wait to play it for our daughter.

(Font: Yesterday Again)

Jared and I first heard Murder in the City at Bumbershoot back in 2007 (you can see that exact performance of it right here), and immediately fell in love with it. Shortly after Scott Avett had his baby girl, he changed one of the lyrics to "make sure my daughter knows I loved her, make sure her mother knows the same" - so when we found out we were having a girl, the song became even more special for us.  The lyric in this print is the last line of the song, and we hope that someday those words mean as much to our daughter as they mean to us.

Here are links to download the prints (for personal use only, please):

[dm]6[/dm]

[dm]7[/dm]

Email or comment if you want the PowerPoint files so you can change the fonts and/or colors.

memorial day desserts

IMG_5671.jpg

We went over to our neighbors' for a bbq Sunday, which gave me a much needed excuse to make a couple of the yummy desserts I've found on Pinterest.  The first thing I made was S'Mores Cookie Bars, and they were even tastier and gooeyer than I hoped they'd be (my next door neighbor actually described them as "life-changing.") One thing I recommend doing is spraying your spoon or spatula with Pam before spreading out the marshmallow fluff... it made it MUCH easier to spread.

The second thing I made (because one dessert just wasn't enough) was Peanut Butter Cup Brownies. They're pretty much exactly how they sound - like Reese's Peanut Butter Cups, but with the added deliciousness of brownies. These were pretty easy to make, and though my centers didn't fall during cooling, I used the back of a 1/2 teaspoon to depress each one and that worked really well. They might be Jared's new favorite thing I bake, and my sister has made me promise to make them for her when she comes to visit later this month.

Overall, I loved both of these desserts and would definitely make them again. I highly recommend either one for your next get together, baking whim, or pregnancy induced sugar craving.

link love - 5.27.11

3 day weekend - woohooooooo!!  It's shaping up to be an excellent weekend... I'm finally getting my hair done tomorrow so I won't look like a white trash mama when this kiddo is born, and we're having a little neighborhood bbq on Sunday, which gives me another excuse to bake up some sugary goodness. I may or may not try to organize my sewing space on Monday... still waiting for this nesting thing to hit, but so far my tiredness is trumping everything else. Anywho... here's what I loved from around the web this week:

  • Paint chip gift tags on Paper Crave - I feel like there have been an abundance of paint chip projects floating around the web recently, and  I especially love this one...

  • Coloba Organic Play Mattress on ohdeedoh - This inventive little mattress would be a great addition to any play room.  Too bad it's apparently only sold in Denmark, so I'll have to hold out hope for an Ikea knock-off.

  • Recycled Shirt Dress on three little freckles - There are a lot of tutorials on this idea (making a little girl's dress from a men's shirt), but I really like what Sarah did with the neckline on this one...

link love - 5.20.11

It's finally starting to feel like Spring here in Portland... the sun is shining, people are out and about, and I no longer have to wear a jacket (none of which zip or button anymore anyway.)  Today is set to be the nicest day of the year so far, AND Jared is coming home after being in Seattle all week for work - soooo, I'm in a pretty fantastic mood. Here are some other things that lifted my spirits this week...

  • White Peach Sangria on Celebrations at Home - I've been craving peaches for months now, and as soon as they're in season (and I'm no longer pregnant) I'll be whipping up a pitcher of this sangria.  It looks soooo yummy...

  • Crossover Pinafore on Smashed Peas and Carrots - I love pretty much anything made with this Amy Butler fabric combo, but I particularly love this crazy cute pinafore...

  • Zig Zag baby quilt on Red Pepper Quilts - This quilt is a perfect use of scrap fabric, and I love the unique quilting.

link love - 5.13.11

Happy Friday the 13th!  I was born on Friday the 13th, so I've never bought into the whole unlucky day business.  A Friday is a Friday and that has to be a good thing.  :-) Here's what I loved from around the web this week:

  • DIY Fold Away Drying Rack on Centsational Girl - Your average drying rack is neither aesthetically pleasing nor space saving, so I was quite delighted when I saw this DIY drying rack.  It would greatly perk up the laundry space in our drab, unfinished basement.

  • Make Ahead Freezer Smoothies on The Tidy Nest - Where has this idea been my whole pregnancy!?  Delicious, healthy, easy, quick... I will definitely be making these this weekend.

PS... I finally discovered Pinterest this week (I know, a little late to the game) and holy moly - I'm hooked.  It's an endless source of eye candy and inspiration.  If you haven't checked it out yet I highly recommend it!  (You can see what I've been pinning by clicking on the new "Follow Me on Pinterest" button on the right.)

link love - 5.6.11

Happy Friday!  I hope everyone is recovering nicely from Cinco de Mayo.  I spent last night getting my water aerobics on with a bunch of other pregnant ladies... a stark contrast to my Cinco de Mayos of yore.  :-)  Anyway, here are a few of my highlights from blogland the past couple weeks:

  • Bolefloor on Twig & Thistle - Ohhh, these floors.  I've never seen anything like them.  I'm a sucker for wide plank hardwoods but these might be my new favorites.

  • Railroad Plate and Saucer Set on ohdeedoh - I seem to have a lot of friends with train-obsessed little boys, so I had to share this adorable plate and saucer set.  Cute design, fun for kids, what's not to love?

  • Mall Pretzels on elephantine - Yummmmm.  I've tried to make homemade soft pretzels a few times, but they always end up too dense and not nearly Auntie Annie's-like enough for my tastes.  So when I saw these my hope for making delicious homemade soft pretzels was renewed.  I'll let you know how they turn out!

Have a great weekend!  Jared and I are off to Cannon Beach for a little weekend babymoon.  Amazing food, a jacuzzi tub, and a prenatal massage are just what the doctor ordered.

Peep strawberry cupcakes

peep-cupcakes_side-view.jpg

My block had a potluck Easter dinner this year, so - naturally - I signed up to bring dessert.  And, as with most things, I went a bit overboard.  (Hey, I gotta take advantage of having time to take on crazy baking adventures before the baby comes!)

I'd been wanting to make Sprinkles strawberry cupcakes for a while now, and they seemed a bit Easter-ish, so that's where I started. You apparently have to follow the recipe from this YouTube video (click on "show more"), because the recipe posted on MarthaStewart.com and elsewhere is wrong.  Overall, I really liked the taste of these cupcakes - though I probably could have taken them out a minute or two earlier.  The frosting, on the other hand, was aaaaa-mazing.  I doubled the recipe for both the cupcakes and frosting, and instead of 7 cups of confectioners sugar I only used 6.  There, it's in writing... one time in my life I used less sugar than I was supposed to.  Any more and I felt like the sweetness would have overwhelmed the strawberry flavor.

Once everything was baked and mixed, it was time to decorate.  My mom has always made a Peep cake for Easter, so I decided to carry on the tradition - with a twist.  I smeared a bit of frosting on the bottom of a Peep, stuck it to the cupcake, piped drops of frosting around the Peep using an Ateco #32 piping tip, and finished with a pinch of sprinkles.

Since not everyone is a fan of Peeps, I made half with fresh strawberries on top instead of Peeps.  (While I may never understand these Peep-haters, I still want them to eat my cupcakes.)

I used the same basic approach to decorating the strawberry version...

I'm not going to lie, I took a break in the middle of writing this post to eat the very last Peep cupcake.  So sad to see them go.  Until next year my Peep friends...