amy butler's short pleated aprons

As late as last summer I was still secretly hoping to do a 100% handmade Christmas... yyyyyeah, that didn't really work out. But I did manage to make a couple things for my sister and mom - well 2 of the same thing: Amy Butler's Short Pleated Aprons from her In Stitches book.

If you're thinking about tackling this pattern, I can assure you it's about as easy as Amy Butler gets. You can make each apron in only a few hours (I'm pretty sure the pressing took longer than the actual sewing,) and all you need is thread and a yard and a half of fabric - no special notions - which is very rare for an Amy Butler pattern.

Here's a close up of the waist band, pocket, and towel loop:

And here are the beautiful recipients!

(FYI, in case you're curious... I used Midwest Modern Fresh Poppies and an unknown Westminster fabric for my sister's apron, and Daisy Chain Clematis for my mom's apron.)

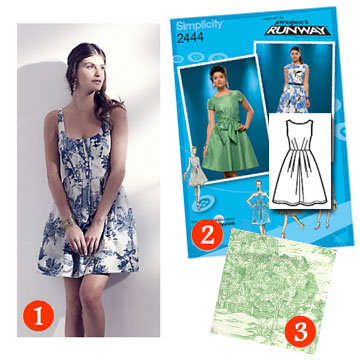
make this look: garden wedding

  1. Original dress: Anthropologie
  2. Pattern: Simplicity 2444
  3. Green toile: Fashion Fabrics Club

Today’s “make this look” is proof that I’m living in sewing dreamland… I’m not going to a wedding this weekend, I’m cleaning out my basement.  In fact the only weddings I’m going to this year are both in October, when it will be cool and drizzly and decidedly un-gardenlike.  But alas, while I’m wearing grubby housework clothes this weekend I’ll be dreaming of wearing this lovely little number from Anthropologie – which you can knock off and make your own for a fraction of the price.  You’ll need Simplicity 2444, 3 ¼ yards of green toile, and 3/8 yard of lightweight fusible interfacing.  (After my Weekender Bag experience, I swear by Pellon Stacy Shape-Flex.)  Finish the look with a gold cuff, earrings, and sandals.

Have fun with your Pinot and finger sandwiches!  I'll be in my basement, wondering how we accumulated so much stuff we have absolutely no use for.

baby shower gift set

My dear friend Angela is expecting her first baby any minute now, and I was lucky enough to be home in Virginia for her shower a couple weeks ago.  About a month before the shower I started searching the web for gift ideas and settled on a nursing cover / burp cloth combo set.   (I'm not one for going completely off-registry, so Jared and I also got her the breast pump and pump car charger she'd been wanting... yes I know, a bit of an accidentally awkward theme gift.)  Angela doesn't know if she's having a boy or girl (I'm in awe of her will power), and I had a stash of Amy Butler's Morning Glory fabric so... voila:

The nursing cover tutorial couldn't have been easier.  As you can see I opted to use one fabric (I also skipped the optional pocket.. shhhhh.)

I went a little off-tutorial for the burp cloths, though not intentionally.  The tutorial makes it very clear that you should cut your fabric to the size of each pre-washed cloth diaper, as each one is different and very rarely 18" long.  So what did I do?  I cut each strip 18" inches long!  Brilliant.  I didn't have enough fabric left over to cut new strips, so I added the ribbon trim to the top and bottom of the strips (instead of down the sides) to hide the shortages.  They still look pretty cute, though.  Right?  (Yes, in my humble-completely-biased-opinion.)

I added a very special little touch to this gift set...

...but more on that later.  :)

the mapron

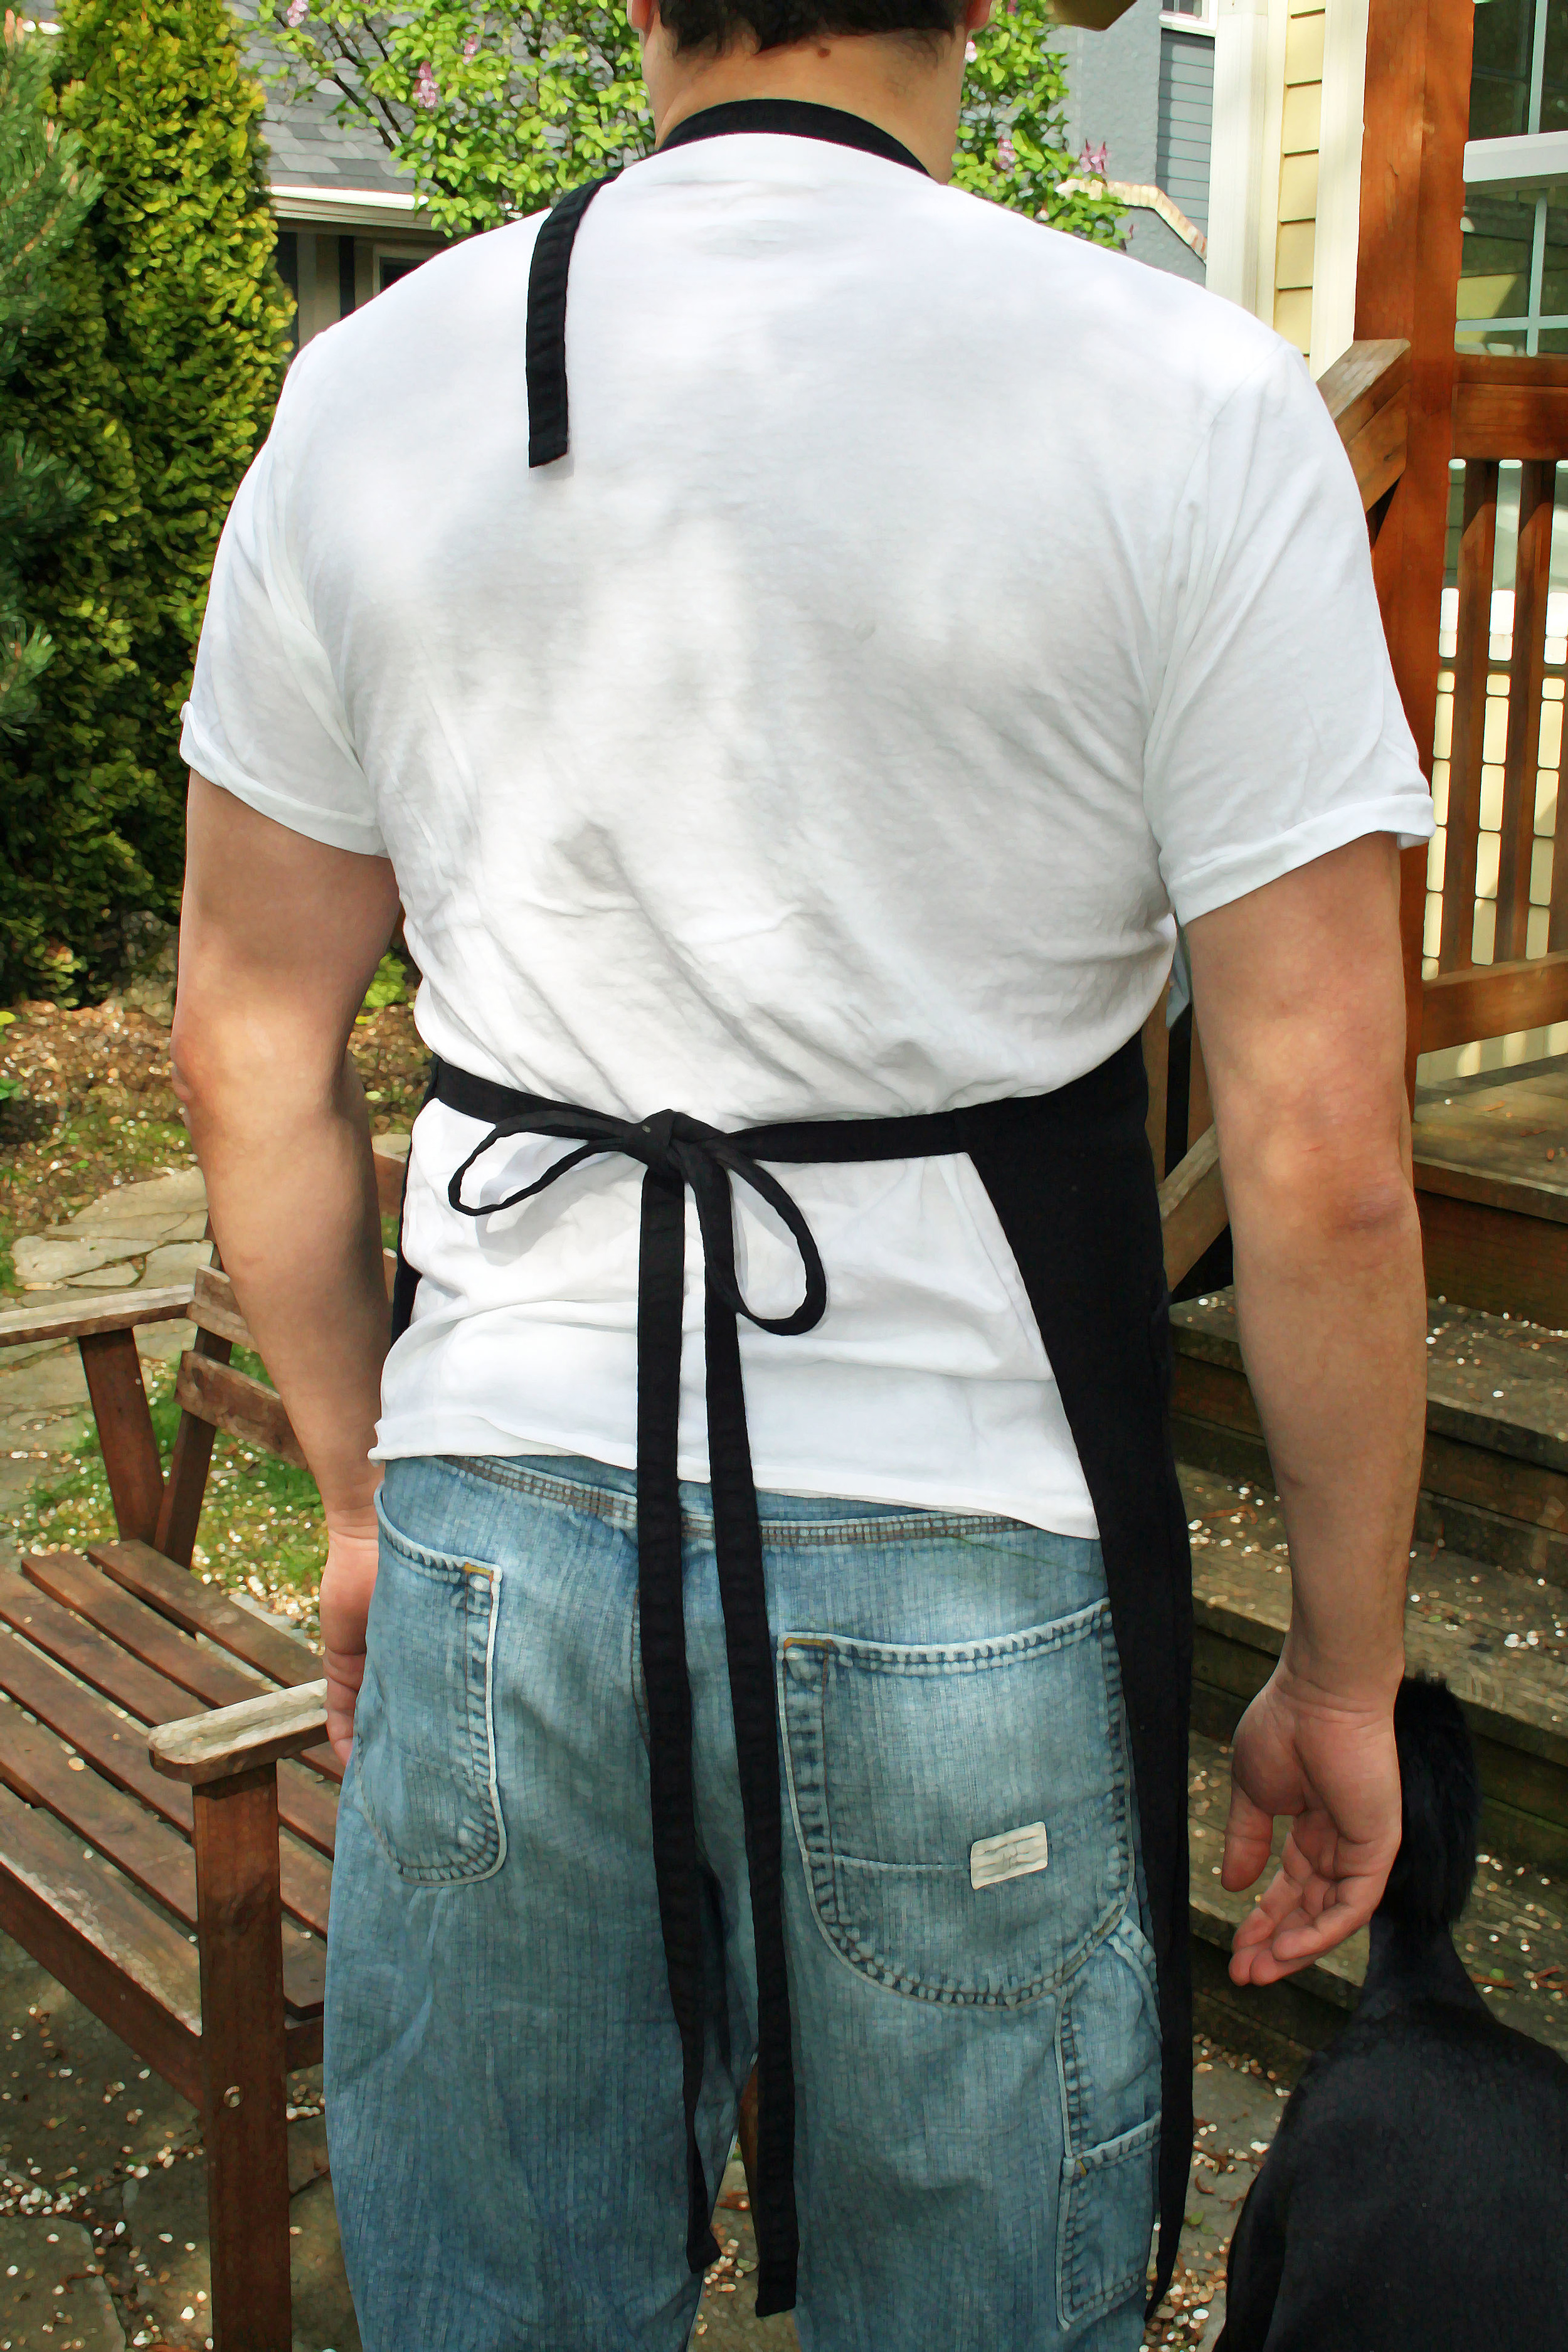
Not long after Jared and I moved in together, I knew I had to convince him to start wearing an apron.  See, he does most of the cooking and I do the laundry… which means I spend a lot of time standing in front of the washer fighting a never ending battle with the food stains on his clothes.  Don’t get me wrong, I know how lucky I am to have a husband that cooks dinner for me every night.  I just wish it wouldn’t end up on his shirts.  Hence, the need for an apron, or in his case - a mapron.  His preference was for one that was the complete opposite of my girly Anthropologie apron, so I went with basic black using Kwik Sew 3613.  The pattern couldn’t have been easier, but the apron on its own was a little boring so I busted out the Yudu and screen printed a grungy looking cutlery design on the front.

Amy Butler's Wide-Leg Lounge Pants... finally!

I've been wanting to make Amy Butler's Wide-Leg Lounge Pants ever since I got In Stitches. They might actually be the reason I got the book in the first place. So along with the gifts for Lindsey and David, I threw the lounge pants onto my Christmas craft list.  For the primary fabric I chose Midwest Modern 2 Happy Dots in Ice, and for the cuff I chose Belle Kashmir in duck egg.  (Thank you, Amy Butler, for making your fabric collections coordinate so nicely with one another!) The pattern was easy enough to follow, though I varied from the instructions a bit:

  • I didn't have freezer paper, so I used printer paper by taping the sheets together and cutting them to size.
  • I used cotton twill tape for the drawstring.
  • I added 5 inch cuffs in a coordinating fabric.

Here are the finished pants...

Yudu, American style

After getting a Yudu for my birthday this year, I thought long and hard about what I wanted to do for my first project.  It made sense to start with a t-shirt, but of what and for whom?  Then, early last month my sister called to tell me that her husband, Dave (originally from South Africa), passed his citizenship test and was officially a U.S. citizen!  I hadn't thought of a good Christmas present for him, so I thought this would be the perfect chance to break out the Yudu and make him a t-shirt to commemorate his new patriotic status.  Here's the design I came up with:

Yes, that's my brother-in-law's face. I Photoshopped a picture of him, along with the pie and glove clip art so they'd all have the same graphic style.

I was a total beginner to screen printing, so the first step for me in using the Yudu was to learn the basic steps of how to screen print. I found screen printing to be far more science than craft, at least until you get to the ink part. But once I "got it," particularly the whole emulsion thing, it was a whole lot easier to learn how to use the Yudu. Sadly even with my newfound understanding, I still screwed up burning my first screen. I didn't get the screen wet enough before applying the emulsion, and since I wasn't totally sure how it was supposed to look, I went ahead and dried it to see how it would turn out. It didn't. Thankfully I knew when to admit defeat, so I drove to Michael's to get some emulsion remover, and started over. (Maybe it's just me, but it seems like this is definitely one of those things you should be prepared to screw up a couple times before getting it right.)

Anyway, once I got the screen successfully burned and dry (fyi, I found it takes multiple cycles with the Yudu dryer to get the screen completely dry) it was time to prep it for printing. Per the instructions, I taped the back of the screen around the edges and used Blockout to fill any holes or imperfections in the emulsion. I also taped the front of the screen just above the text to make sure I didn't get any ink above the emulsion line.

I had zero hope of getting the printing part right on the first try, so I used one of Jared's old white t-shirts as a test shirt. And of course, it turned out great. This would never have happened had I started with the new t-shirt.

So the pressure was on... the test shirt was a success and now it was time to do it for real. Aaaaand... FAIL. The ink on the pie was a bit smeary and while everything else looked okay, that one spot would have bugged me too much to feel good about giving the shirt to Dave as-is. So it was either back to American Apparel for another shirt, or try my luck with washing the ink out of the failed shirt. I had nothing to lose, and since the Yudu ink is water-based, I washed the shirt. To my amazement, it actually worked!

Clearly you couldn't print a totally new design onto the shirt, and it likely only worked so well because the shirt and ink were close in color, but for re-printing the same image on a shirt to try to correct a mistake it definitely works. I washed it twice and let it air dry because I was afraid the heat from the dryer might set the ink.

So after all that, I tried again (making sure to line up the shirt so that I'd print as close as possible to the first, now washed and faded, image) and thankfully the second time was the charm. Here's Dave showing off his new shirt:

Queue Lee Greenwood...

the first batch of christmas crafts

My ability to blog about this first batch of Christmas crafts sadly means my short trip to Michigan to visit my best friend, Lindsey, has already come and gone. (All you girls lucky enough to live in the same town as your best friend - stop reading this, go over to her house and give her a big fat hug, because you are very very fortunate!) I have a small tendency to spoil Lindsey, especially since the birth of her son Will, so I tried to scale back this year and focus more on craft than cost. Will's presents were easy - Amy Butler's Little Stitches provided plenty of inspiration and baby clothes are so small they require very little fabric. I decided on the Kimono PJ pants and used Moda's Funky Monkey fabric in Sock Blue, Cream Counting Monkeys and Brown Sock Texture (for the cuffs.)

I used leftover fabric from the pants to applique coordinating onesies:

Here are the finished sets:

A couple tips for these pants... 1) Use 3/4 inch wide elastic or make the casing for the elastic a little bigger because the 1 inch elastic was a really tight fit. 2) Make the pants about 1-2 sizes larger than you think you'll need. Will is 5 months, a bit small for his age, and just started wearing 6-9 mos. clothes. I thought I'd be safe making the pants size 6-9 mos. but they were pretty snug around his diaper. They'll be fine for him for only another month or so, which is why I'll be making him 2 more pairs in a bigger size.

For Lindsey I aimed for a combination of pampered and practical. I'd been dying for an excuse to pick up Amy Butler's new Love collection, and thought it would be perfect to use for a little library tote since Lindsey's a regular at the Berkley Public Library. I used Lotta Jansdotter's Simple Tote pattern as a starting point, and added lining using some leftover fabric from Lindsey's Weekender Bag.

This bag was super easy to make and the lining added a nice finished look to the original pattern. I used the bag as gift wrapping and threw in some Philosophy Amazing Grace bath products (the pamper part), and the Exhale: Core Fusion - Pilates Plus DVD (the practical part.) Lindsey loves working out but as a new mom doesn't have a ton of time, so the 10 minute workouts on this DVD are a great solution.

More Christmas crafts to come... :-)

ties and dachshunds and spartans, oh my

As if I needed another excuse to craft, my best friend gave birth to her first child this summer... a handsome and happy little guy named, Will. I am a firm believer that stuff is just cuter when it's small, so when I saw the appliqued tie onesie tutorial on Crap I've Made, I could think of nothing cuter to make for the new man in my life.  I used some of my hubby's old clothes for the fabric, and followed Char's instructions to create onesie #1:

But why stop there when onesies come in packs?  :-)  The dog in Will's life is a sweet little dachshund mix Lindsey's parents adopted named Kallie, so I created my own doggie template and used one of the hubby's old dress shirts for the fabric.

Front

Back

And lastly, I had to make sure Will was decked out in some one-of-a-kind Spartan gear - which Lindsey was sweet enough to put on him when he went for his 3 month pro pics.

once mitten twice shy (sorry, had to do it)

My first non-scarf knitting project wasn't nearly as complicated as I feared.  I wanted to make some nice mittens for my sister for Christmas and found a free pattern on Ravelry (a wonderfully endless source of inspiration) I thought would perfect: Cozy Cabled Mittens.  The pattern was easy to follow, except for the thumb part - which I imagine is awkward for a first-timer no matter what.  All in all, I'm pretty darn happy with how the project turned out.

three weddings and a shopping hiatus

On January 1st, 2008 I made a promise to myself that I wouldn't buy any new clothes for an entire year. I was allowed to buy second hand (most often from Buffalo Exchange downtown) and if I wanted something new, I had to make it myself. The point was to try to force myself to learn how to make a variety of different types of clothes. As with most of my overly-ambitious crafting adventures, things didn't work out quite as I had planned (i.e. I didn't make nearly as many clothes as I thought I would.) The first thing I made was a dress for our friends' wedding that spring. I started with McCall's pattern M4826, and modified it to add a panel insert to the front of the skirt.

I had zero expectations for how it would turn out, so I was pleasantly surprised when it actually fit!  (The duct tape dress form Jared helped me make helped a ton.)

The next dress was for another wedding and this time I used Simplicity 2951.  In hindsight, I wish I'd used a cotton fabric (maybe in navy) instead of satin.  Something about the light colored satin and the shape of the dress made it feel slightly too young for me, but I'm still happy with how it turned out.  The fit was even better than the first dress, and when it was done I felt like I was actually starting to get a hang of this whole dress making thing.

(ignore the bumpiness of the dress form)

The third dress was for - you guessed it - another wedding.  I've always loved the simplicity and ease of matte jersey wrap dresses (perhaps from my days working retail at Banana), so I decided to try DKNY pattern V1027.  It was such an easy dress to make (especially compared to the first two!) and it's super comfy to wear.

Bodice front

Bodice back

Full dress from the front

Full dress from the back

a scarf made for Michigan winters

Winters are no picnic here in Portland, but they're nothing compared to what I dealt with for the 5 years I lived in Michigan.  There's nothing quite like the feeling of single digit temperatures to make you want to stay inside by a warm fire until May.  But, when you have to go outside, braving the cold often means sacrificing style for warmth.  That's why, when I saw this amazing chunky braided scarf at Anthropologie I knew I had to replicate it for my best friend, Lindsey - whose love of Michigan winters is borderline crazy.  I don't have a picture of the original Anthro version, but my version was made by knitting 3 long, skinny scarves (approximately 30 sitches across of stockinette stitch) and then braiding them together.  I hand-sewed the scarves together in the back where they crossed to make it more stable, then attached tassels at both ends using all 3 yarn colors.

Sadly the only pictures I have are the ones I took with my old Blackberry (so, sorry about the crappy image quality!):

Scarf close-up

Full view

me wearing the finished scarf