Amy Butler's Wide-Leg Lounge Pants... finally!

I've been wanting to make Amy Butler's Wide-Leg Lounge Pants ever since I got In Stitches. They might actually be the reason I got the book in the first place. So along with the gifts for Lindsey and David, I threw the lounge pants onto my Christmas craft list.  For the primary fabric I chose Midwest Modern 2 Happy Dots in Ice, and for the cuff I chose Belle Kashmir in duck egg.  (Thank you, Amy Butler, for making your fabric collections coordinate so nicely with one another!) The pattern was easy enough to follow, though I varied from the instructions a bit:

  • I didn't have freezer paper, so I used printer paper by taping the sheets together and cutting them to size.
  • I used cotton twill tape for the drawstring.
  • I added 5 inch cuffs in a coordinating fabric.

Here are the finished pants...

Yudu, American style

After getting a Yudu for my birthday this year, I thought long and hard about what I wanted to do for my first project.  It made sense to start with a t-shirt, but of what and for whom?  Then, early last month my sister called to tell me that her husband, Dave (originally from South Africa), passed his citizenship test and was officially a U.S. citizen!  I hadn't thought of a good Christmas present for him, so I thought this would be the perfect chance to break out the Yudu and make him a t-shirt to commemorate his new patriotic status.  Here's the design I came up with:

Yes, that's my brother-in-law's face. I Photoshopped a picture of him, along with the pie and glove clip art so they'd all have the same graphic style.

I was a total beginner to screen printing, so the first step for me in using the Yudu was to learn the basic steps of how to screen print. I found screen printing to be far more science than craft, at least until you get to the ink part. But once I "got it," particularly the whole emulsion thing, it was a whole lot easier to learn how to use the Yudu. Sadly even with my newfound understanding, I still screwed up burning my first screen. I didn't get the screen wet enough before applying the emulsion, and since I wasn't totally sure how it was supposed to look, I went ahead and dried it to see how it would turn out. It didn't. Thankfully I knew when to admit defeat, so I drove to Michael's to get some emulsion remover, and started over. (Maybe it's just me, but it seems like this is definitely one of those things you should be prepared to screw up a couple times before getting it right.)

Anyway, once I got the screen successfully burned and dry (fyi, I found it takes multiple cycles with the Yudu dryer to get the screen completely dry) it was time to prep it for printing. Per the instructions, I taped the back of the screen around the edges and used Blockout to fill any holes or imperfections in the emulsion. I also taped the front of the screen just above the text to make sure I didn't get any ink above the emulsion line.

I had zero hope of getting the printing part right on the first try, so I used one of Jared's old white t-shirts as a test shirt. And of course, it turned out great. This would never have happened had I started with the new t-shirt.

So the pressure was on... the test shirt was a success and now it was time to do it for real. Aaaaand... FAIL. The ink on the pie was a bit smeary and while everything else looked okay, that one spot would have bugged me too much to feel good about giving the shirt to Dave as-is. So it was either back to American Apparel for another shirt, or try my luck with washing the ink out of the failed shirt. I had nothing to lose, and since the Yudu ink is water-based, I washed the shirt. To my amazement, it actually worked!

Clearly you couldn't print a totally new design onto the shirt, and it likely only worked so well because the shirt and ink were close in color, but for re-printing the same image on a shirt to try to correct a mistake it definitely works. I washed it twice and let it air dry because I was afraid the heat from the dryer might set the ink.

So after all that, I tried again (making sure to line up the shirt so that I'd print as close as possible to the first, now washed and faded, image) and thankfully the second time was the charm. Here's Dave showing off his new shirt:

Queue Lee Greenwood...

five for 2010

With the exception of my no new clothes in 2008 declaration, I’m not much for New Year’s resolutions (a point made even clearer by the fact that it’s almost February and I’m just now getting around to posting this.) It’s not that I don’t have any bad habits to drop (just ask my husband), I just feel like evaluating all the things that are wrong with me and deciding how to make them better would be depressing. Can’t it be a rule that once you reach a certain age, all the things you’ve resolved to overcome but haven’t yet (nail biting, dawdling, gummy bear and marshmallow addictions) are declared minor character quirks? Which is really just a longwinded way of saying, aren’t the things we DO far more important than the things we manage to STOP DOING? I think so, and it’s with that mentality that I created my master to-do list for 2010… five things I want to be able to check off come December 31st:

  1. Make our new house feel like home – The past few weeks have made me certain that the expression “labor of love” came from someone who had recently purchased their first home. Amidst all the loan documents you have to sign they should slip you one that says “I hereby acknowledge that all those things we want to do to the house will henceforth become things we have to do and we will inevitably feel overwhelmed and drained of our savings.” Needless to say, reality has set in. Our house is old and flawed and has been the victim of a couple small DIY renovations gone awry, but… it’s ours and it’s perfect. My goal for year 1 in the house is simple: make it feel like home. Whether it’s with paint, fabric, art, photos, wood – I’m determined to fill the house with handmade touches that represent us, our favorite music, and our travels. So be on the lookout for home décor projects as the year goes on. (And if you don’t see any, please feel free to flood my inbox with emails reminding me to get my butt in gear!)
  2. Re-engage at my “real” job – 2009 was an interesting year at my job, to say the least. Without getting into the gritty details, becoming desensitized to what was going on at work was the only way to stay sane. And now that the dust has settled I find myself needing to get re-engaged. I’m not quite sure how I’m going to accomplish this one, but I’m going to start by making a conscious effort every day to be more focused and organized… perhaps helped along by some lovely new stationery goods from Paper Source. Wait, did I just build a whole year's goal around having an excuse to spend more money at Paper Source? Kinda brilliant. Kinda sad.
  3. Launch the made by bird Etsy shop – Yep, that’s right. This is the year. The first of the products I’ll be selling is currently being tested by two of my dearest girlfriends, and I have a couple more I’m hoping to get out of my head and onto fabric before summer. Stay tuned!
  4. Run a marathon - The Rock ‘n Roll San Diego marathon to be exact. And that’s all I have to say about that right now.
  5. Greatly improve my photography skills – The need for this goal should be painfully obvious given the number of posts on here that have included pics from my phone. For shame! But, I promise, I’m working on it. Our new house has lots of windows and a backyard so it should be much easier to photograph my projects in natural light. Any tips or links you’d like to share on craft/sewing photography would be greatly appreciated!

So there you have it.  My mantra for the year is to be focused and fearless.  What about you?  What are you hoping to accomplish this year?

the first batch of christmas crafts

My ability to blog about this first batch of Christmas crafts sadly means my short trip to Michigan to visit my best friend, Lindsey, has already come and gone. (All you girls lucky enough to live in the same town as your best friend - stop reading this, go over to her house and give her a big fat hug, because you are very very fortunate!) I have a small tendency to spoil Lindsey, especially since the birth of her son Will, so I tried to scale back this year and focus more on craft than cost. Will's presents were easy - Amy Butler's Little Stitches provided plenty of inspiration and baby clothes are so small they require very little fabric. I decided on the Kimono PJ pants and used Moda's Funky Monkey fabric in Sock Blue, Cream Counting Monkeys and Brown Sock Texture (for the cuffs.)

I used leftover fabric from the pants to applique coordinating onesies:

Here are the finished sets:

A couple tips for these pants... 1) Use 3/4 inch wide elastic or make the casing for the elastic a little bigger because the 1 inch elastic was a really tight fit. 2) Make the pants about 1-2 sizes larger than you think you'll need. Will is 5 months, a bit small for his age, and just started wearing 6-9 mos. clothes. I thought I'd be safe making the pants size 6-9 mos. but they were pretty snug around his diaper. They'll be fine for him for only another month or so, which is why I'll be making him 2 more pairs in a bigger size.

For Lindsey I aimed for a combination of pampered and practical. I'd been dying for an excuse to pick up Amy Butler's new Love collection, and thought it would be perfect to use for a little library tote since Lindsey's a regular at the Berkley Public Library. I used Lotta Jansdotter's Simple Tote pattern as a starting point, and added lining using some leftover fabric from Lindsey's Weekender Bag.

This bag was super easy to make and the lining added a nice finished look to the original pattern. I used the bag as gift wrapping and threw in some Philosophy Amazing Grace bath products (the pamper part), and the Exhale: Core Fusion - Pilates Plus DVD (the practical part.) Lindsey loves working out but as a new mom doesn't have a ton of time, so the 10 minute workouts on this DVD are a great solution.

More Christmas crafts to come... :-)

ho-ho-homemade buttercream frosting!

Oh cupcakes... is there anything better? No, especially if we're talking holiday cupcakes. Earlier today I decided to whip up some cupcakes for a holiday party we were going to this afternoon and after a quick Flickr search, decided to put my own spin on these.   I used Betty Crocker Devil's Food cake mix, and instead of store frosting I experimented with making my own buttercream frosting.  The first recipe I used was too sweet and almost glaze-like (which the reviews would have told me had I bothered to read them), so Jared and I hustled to the co-op down the street to get more butter and I tried for round 2, this time using a slightly different, much more positively reviewed recipe.  It tasted SO good, and with a bit of green food coloring the frosting was done.  (By the way, I had never previously looked into what was involved in making your own frosting, but it's surprisingly super easy.  If you can make cupcakes from a mix, you can definitely make your own frosting.)

Instead of using my standard knife to cupcake approach, I loaded the frosting into a Ziploc bag, snipped off a small corner, and tried my hand at piping the frosting onto the cupcakes.  It probably would have been easier to use a pastry bag and piping tip, but in a pinch I think the Ziploc baggy worked pretty well.  To finish off the cupcakes I sprinkled them with crushed candy canes and stuck each one with a mini candy cane.

the bird is the word

Thanksgiving in our house this year was far less stressful due to one essential addition to our appliance arsenal: The Big Easy Infrared Turkey Fryer from Char-Broil.  I was skeptical when Jared first told me about it, but after he tested it out with a small chicken a couple weeks ago, I knew he was on to something.  In addition to cooking perfectly juicy poultry in half the time of a normal oven, using the fryer this year meant one important thing: a free oven ALL DAY.  All of you who've attempted the chaos of trying to perfectly time all of your Thanksgiving dishes without a double oven - put this fryer on your Christmas list.

And here's the delicious turkey Jared cooked:

The seasoning was his Simon & Garfunkel blend of parsely, sage, rosemary, and thyme whipped into butter with crumbled bacon

We tried a new stuffing this year, Tyler Florence's Carmelized Onion and Cornbread Stuffing, and it was a big hit! Easily one of the best stuffings I've ever had. We couldn't find cornbread muffins, so we used an 8x8 tin of cornbread from Whole Foods instead, and it worked great.  Some of the reviews on Food Network said the stuffing turned out too dry, so I added a few extra splashes of heavy cream and stock just in case.

For dessert we had Martha Stewart's Old Fashioned Apple Pie and Sarah brought down a couple dozen of her famous cupcakes as a belated b-day/thanksgiving treat.  The most popular were the carrot with cream cheese frosting, and classic yellow cake with chocolate fudge icing (honestly, if there's a better cupcake on earth I have yet to find it.)  Sarah even made custom cupcake picks for the occasion using paper punches and her own little bird template.  Let me know if you'd be interested in a tutorial and I'll ask her to put one together.

For more food pics from our yummy little Thanksgiving dinner click here.

Thanksgiving weekend coming to an end can only mean two things: 1) running, yoga, and pilates are all very much in order, and 2) I have less than a month to finish a long list of Christmas crafts. Ack!

a Yudu-tastic birthday

I woke up last Friday the 13th still feeling a little too sleepy to celebrate my birthday, but Jared insisted on giving me by present that morning, and who was I to argue?  I had no idea what he’d gotten me, and had even less of a clue when he began pushing this huge wrapped box into our bedroom.  I began tearing off the paper and saw the ProvoCraft logo… and then Yudu!  Seriously, I have the best husband ever. Did I mention that he intentionally ordered it from Paper Source to make sure I got the $50 PS gift card that comes with it?  Yeah, best husband ever.  :-)

I can’t wait to start using this thing.  Nothing in my house is safe from the impending screen-printing insanity.  Just when I thought I had all my Christmas projects planned out! I already have some printing ideas, but first I have to figure out how to actually use it.  Stay tuned for a review, tips, and hopefully some project pics.

holy stromboli

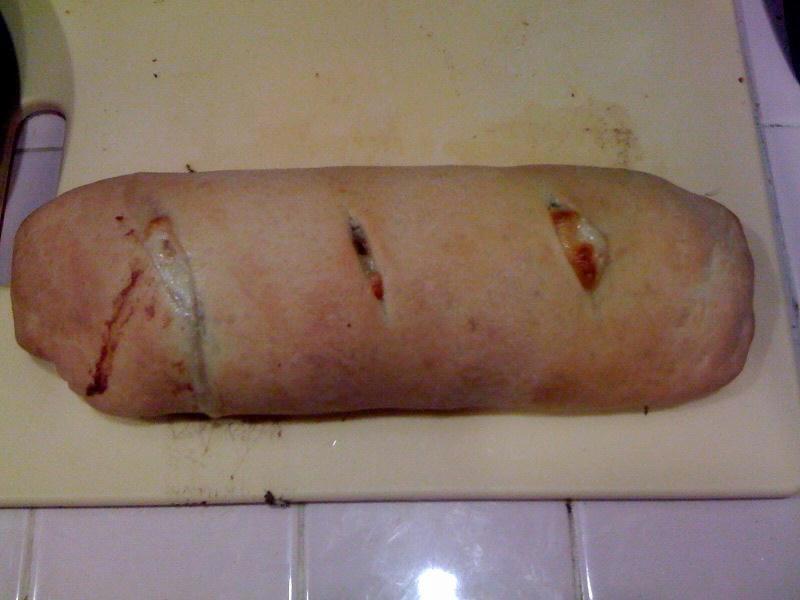
We made homemade pizza a few weeks ago and had some leftover dough to use up, so I went on the hunt for a good Stromboli recipe.  Jared had somehow made it through 20+ years in NJ/NY without ever having the deliciousness that is Stromboli. Very strange.  Anyway, I decided to go with this recipe, courtesy of one of my favorite blogs: Serious Eats.  We nixed the peppers, and used salami instead of pepperoni, but OH MY did this thing turn out good.  It was one of those meals that after every bite you feel it necessary to declare how good it tastes, high-fiving one another after every 3rd bite or so for possessing such culinary brilliance.  Honestly, it was that good.

homemade stromboli

We only had ½ the dough required for the recipe, so we made 1 roll instead of 2, and halved all the other ingredients.  1 roll ended up being plenty for 2 people, and I even had a little bit leftover to take for lunch the next day.  I highly recommend trying this out, because it’s really much easier than you’d expect.  Oh, and here’s the pizza dough recipe we used.  Only tip I have is to make your “well” in the flour fairly wide.  We tried a volcano approach and ended up breaching the flour walls, resulting in an oily mess all over our kitchen counter and floor.  The second time around, we made the well about 5 inches in diameter and that worked much better.

Happy eating!

4 Weekender Bags in 4 weeks

I've had a lot of overly-ambitious crafting ideas in my life, but this one was beyond insane - with only a month to go until my wedding I would make EACH of my bridesmaids the (infamous) Weekender Bag by Amy Butler.  That worked out to 4 bags in 4 weeks.  Of course I got my heart set on the idea before I searched the blogosphere and discovered that this was a beast of a pattern.  But, I was determined.  The first bag took me about 2 weeks (with my bachelorette party in Vail squeezed in there) and by the time it was done I was dreading the fact that I had 3 more to go.  It was everything other bloggers said it would be, and then some.  No tears, but a heck of a lot of ripped seams.  The whole process was so exhausting that the only pictures I took were with my phone!  (I promise, this is the last project I'll post with such crappy pics.)

Anyway, here's bag #1:

The second bag was SOOO much easier than the first one.  In fact, if you're attempting to make this bag, I definitely recommend making two - just so you can remember the whole thing fondly and enjoy the satisfaction of feeling like there's no pattern you can't handle.  Here's bag #2:

And bag #3:

Finally, (and trust me, it was a BIG, WONDERFUL, HAPPY finally) bag #4:

It was all worth it in the end:

Here's my advice should you decide to embark on your own Weekender Bag adventure...

Scour the blogosphere for all the hints, tips, and pictures you can find.  The tips from other bloggers that I found most useful were:

1) Use seam tape when making the prepared cording instead of sewing the seam closed. I tried it both ways and the seam tape actually creates a much cleaner look and you don't have to worry about making sure the seam is hidden when you sew the cording to the exterior panels.

2) Add interior pockets. The pattern doesn't come with any, and it's such a big bag having interior pockets is a really nice addition. I added a small zipper pocket (tutorial here), and used the large exterior pocket pattern piece to create two additional pockets inside (cut 2 extra pockets when you do your initial cutting, sew wrong sides together, then attach it to the lining by basting the sides and bottom, and sewing a seam up the middle to create two pockets.) You'll have more than enough fabric leftover to make the pockets, so don't worry about having to buy extra yardage.

3) A lot of blog posts indicated that there was no such thing as a 30" non-separating zipper. There is. I got this one and it was neutral enough to use for all 4 of my bags (you really can't see the zipper much once it's done anyway.) You might want to add a little zipper pull, though, because the zipper takes a bit of breaking in, especially on such a big bag.

4) Many of the blog posts below (and in general) were written before Amy Butler revised the pattern to improve upon her first version. If you buy the pattern now, it should have a lot of the tips and work-arounds already included (such as using Peltex instead of Timtex.)

5) The cutting for this bag takes a LONG time. Be prepared to devote most of your first day to getting everything cut. (You won't feel like doing anything but kicking back with a nice big glass of wine once you're done with this part.)

Here are the blog posts I found most helpful (i.e. couldn't have made it through the first bag without them):

http://miss-behave.de/2009/02/weekender-travel-bag/

http://www.amyalamode.com/blog/2008/09/14/second-times-a-charm-orchristmas-in-september/

http://hiuma.blogspot.com/2008/10/first-big-project-weekender-bag.html

http://craftoholic.blogspot.com/2006/05/my-weekender-bag.html

http://knitlint.wordpress.com/2007/07/14/finished-object-amy-butler-weekender-bag/

ties and dachshunds and spartans, oh my

As if I needed another excuse to craft, my best friend gave birth to her first child this summer... a handsome and happy little guy named, Will. I am a firm believer that stuff is just cuter when it's small, so when I saw the appliqued tie onesie tutorial on Crap I've Made, I could think of nothing cuter to make for the new man in my life.  I used some of my hubby's old clothes for the fabric, and followed Char's instructions to create onesie #1:

But why stop there when onesies come in packs?  :-)  The dog in Will's life is a sweet little dachshund mix Lindsey's parents adopted named Kallie, so I created my own doggie template and used one of the hubby's old dress shirts for the fabric.

Front

Back

And lastly, I had to make sure Will was decked out in some one-of-a-kind Spartan gear - which Lindsey was sweet enough to put on him when he went for his 3 month pro pics.

stocking stitchery

Among the many things Jared and I purchased last year for our first official Christmas at home together were these cute little felt stockings from Joann's.  Having always had personalized stockings growing up, the white stitching on the front of the stocking begged for matching embroidered names on the cuffs.  I've been fascinated by Jenny Hart's amazing embroidery ever since Sublime Stitching, and couldn't wait to get started on my first project. I experimented with a few different ways to get the outline of our names onto the stockings and found the easiest was to do the following:

  1. Use WordArt in Microsoft Word or Illustrator to type out the names in an outlined font.  Be sure to type the names from last letter to first so they read left to right when you transfer them to your project. Lastly, view the names at 100% to make sure they'll be the right size.
  2. Print out the names on regular computer paper.  Place a sheet of tracing paper over your print out and trace the outlines using a transfer pencil.  Make sure you use a pencil color that will be easily hidden underneath your stitches.  I used a white transfer pencil and it worked great.
  3. Transfer the names to your project using a dry iron.  If your project is oddly shaped and won't lay flat, it's helpful to pin the tracing paper down before ironing.

I used white embroidery floss and split-stitch around each of the letters.  Here's how they turned out:

For Jared

For me

For the pups

Happy little family stockings :-)

once mitten twice shy (sorry, had to do it)

My first non-scarf knitting project wasn't nearly as complicated as I feared.  I wanted to make some nice mittens for my sister for Christmas and found a free pattern on Ravelry (a wonderfully endless source of inspiration) I thought would perfect: Cozy Cabled Mittens.  The pattern was easy to follow, except for the thumb part - which I imagine is awkward for a first-timer no matter what.  All in all, I'm pretty darn happy with how the project turned out.

three weddings and a shopping hiatus

On January 1st, 2008 I made a promise to myself that I wouldn't buy any new clothes for an entire year. I was allowed to buy second hand (most often from Buffalo Exchange downtown) and if I wanted something new, I had to make it myself. The point was to try to force myself to learn how to make a variety of different types of clothes. As with most of my overly-ambitious crafting adventures, things didn't work out quite as I had planned (i.e. I didn't make nearly as many clothes as I thought I would.) The first thing I made was a dress for our friends' wedding that spring. I started with McCall's pattern M4826, and modified it to add a panel insert to the front of the skirt.

I had zero expectations for how it would turn out, so I was pleasantly surprised when it actually fit!  (The duct tape dress form Jared helped me make helped a ton.)

The next dress was for another wedding and this time I used Simplicity 2951.  In hindsight, I wish I'd used a cotton fabric (maybe in navy) instead of satin.  Something about the light colored satin and the shape of the dress made it feel slightly too young for me, but I'm still happy with how it turned out.  The fit was even better than the first dress, and when it was done I felt like I was actually starting to get a hang of this whole dress making thing.

(ignore the bumpiness of the dress form)

The third dress was for - you guessed it - another wedding.  I've always loved the simplicity and ease of matte jersey wrap dresses (perhaps from my days working retail at Banana), so I decided to try DKNY pattern V1027.  It was such an easy dress to make (especially compared to the first two!) and it's super comfy to wear.

Bodice front

Bodice back

Full dress from the front

Full dress from the back

a scarf made for Michigan winters

Winters are no picnic here in Portland, but they're nothing compared to what I dealt with for the 5 years I lived in Michigan.  There's nothing quite like the feeling of single digit temperatures to make you want to stay inside by a warm fire until May.  But, when you have to go outside, braving the cold often means sacrificing style for warmth.  That's why, when I saw this amazing chunky braided scarf at Anthropologie I knew I had to replicate it for my best friend, Lindsey - whose love of Michigan winters is borderline crazy.  I don't have a picture of the original Anthro version, but my version was made by knitting 3 long, skinny scarves (approximately 30 sitches across of stockinette stitch) and then braiding them together.  I hand-sewed the scarves together in the back where they crossed to make it more stable, then attached tassels at both ends using all 3 yarn colors.

Sadly the only pictures I have are the ones I took with my old Blackberry (so, sorry about the crappy image quality!):

Scarf close-up

Full view

me wearing the finished scarf

a green tote for a green thumb

This was the bag that reignited my passion for sewing.  My mom taught me how to sew when I was a little girl, so it seemed fitting that my first real project as an adult would be a gift for her.  I decided on the Garden Tote from Lotta Jansdotter's Simple Sewing, with green canvas for the exterior, and black and white floral cotton to create a nice contrast with the interior.

Garden Tote gift set

my adorable Mom proudly showing off her xmas gift

Garden Tote close-up

The design of this tote is great because it has lots of pockets to store your gardening tools, and it's sizable but not so much so that it's too bulky or awkward to carry.  The pattern is fairly easy as far as bags go, and the only real trouble spots were the corners when sewing the bottom to the exterior.  I gave this to my mom for Christmas in 2007, and it's (thankfully) held up very nicely for her since.